October 16, 2026
SA vs AUS 1st Test Review
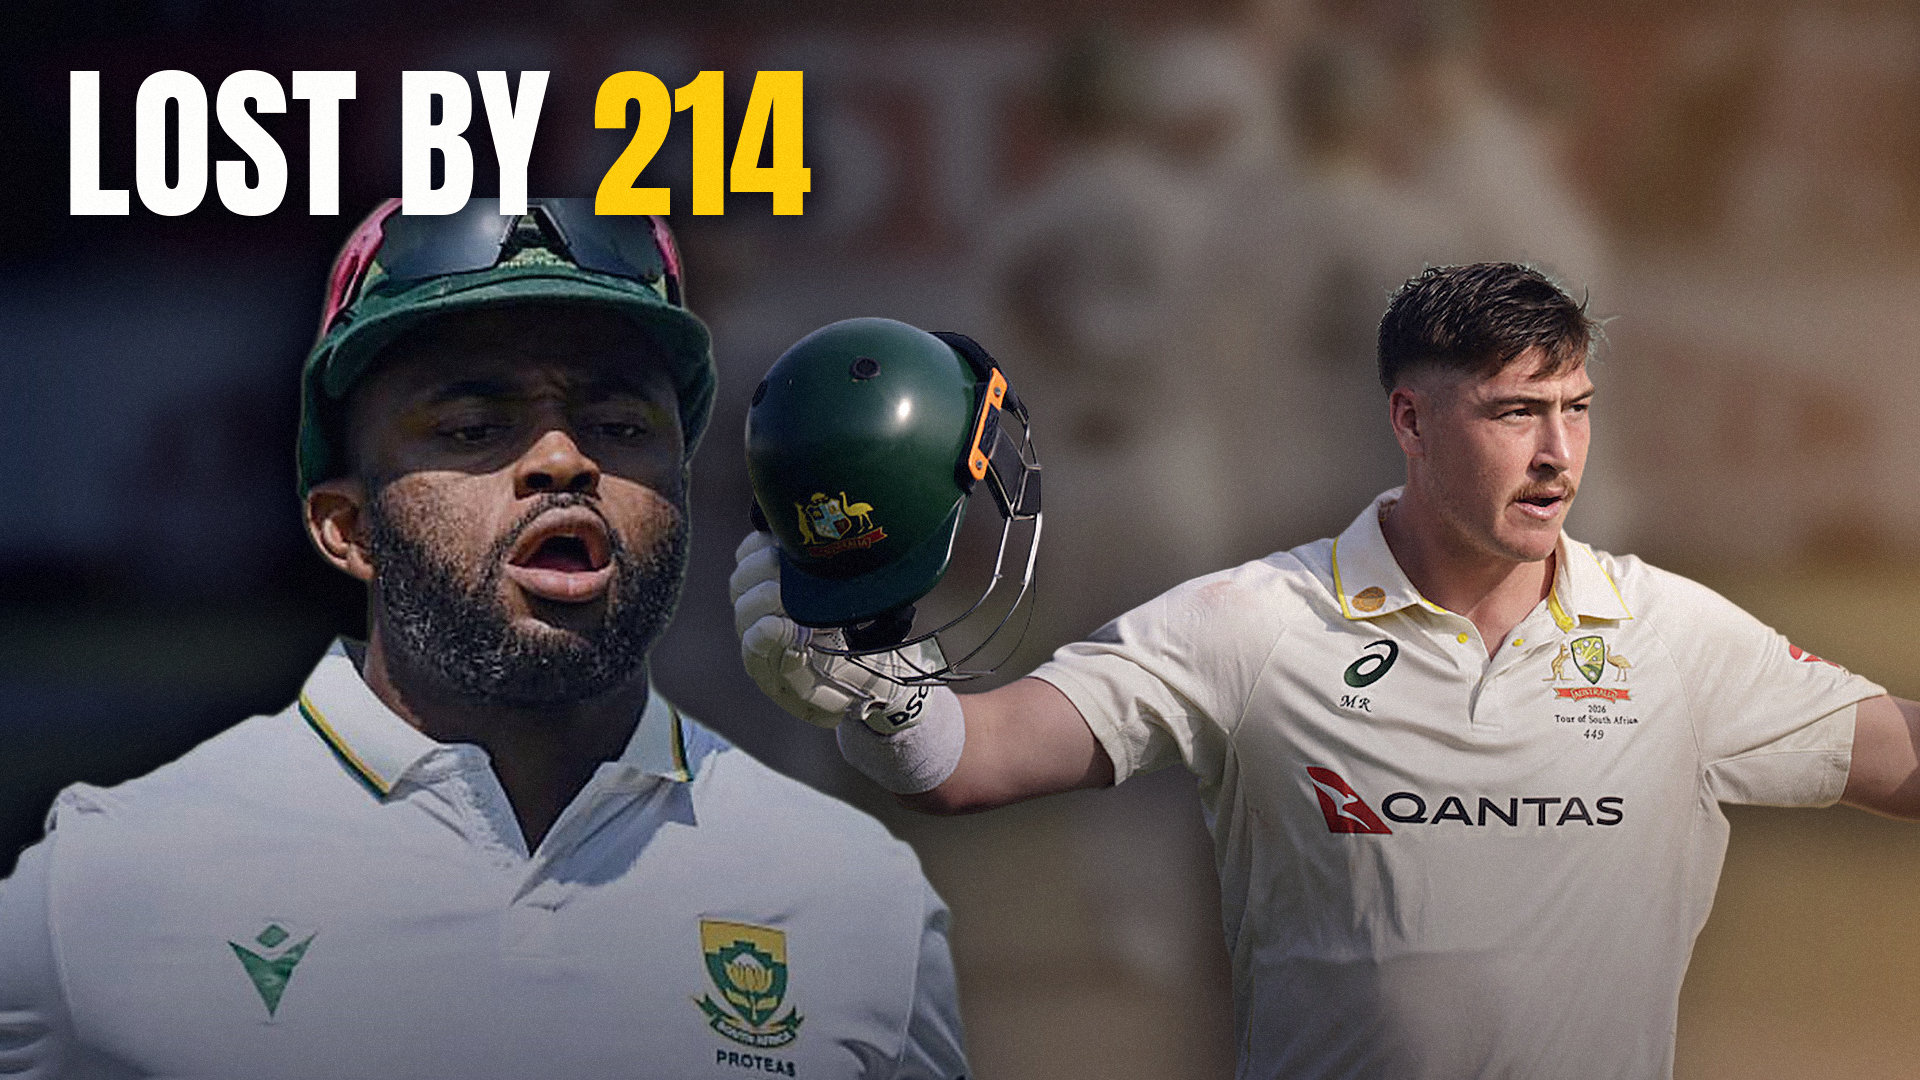
South Africa had Australia at 124 for 6 on Day 1 at Kingsmead, and still lost by 214 runs. We break down Matt Renshaw's record-breaking 190, the Proteas' impatience with the bat, Labuschagne's twin 37s, and what it all means for the 2nd test in Gqeberha.
Introduction
South Africa had Australia right where they wanted them, at 124 for 6 at the end of an early Day 1.
Four days later, the Proteas lost by a massive 214 runs.
Sure, they didn’t have Rabada, and hadn’t played a test match in nearly a year, but a team as good as South Africa should not be squandering away such an advantage.
Where did it go wrong for the Proteas?

South Africa's Start
The game started with Australia winning the toss and electing to bat, but that was about all they had on Day 1. South Africa’s attack dominated the first day of play, picking up 6 wickets within the first 41 overs.
Wiaan Mulder was particularly impressive, bagging the wickets of Head and Labuschagne on Day 1 alone, before cleaning up Cummins and Starc on Day 2. His control of the new ball was superb, swinging it away from the right-hander and nibbling the ball off the seam to pose a threat to both edges. Against Nic Maddinson in particular, he seemed on the verge of picking up a wicket every single ball, targeting the stumps and even getting a plumb LBW that the Proteas didn’t review.
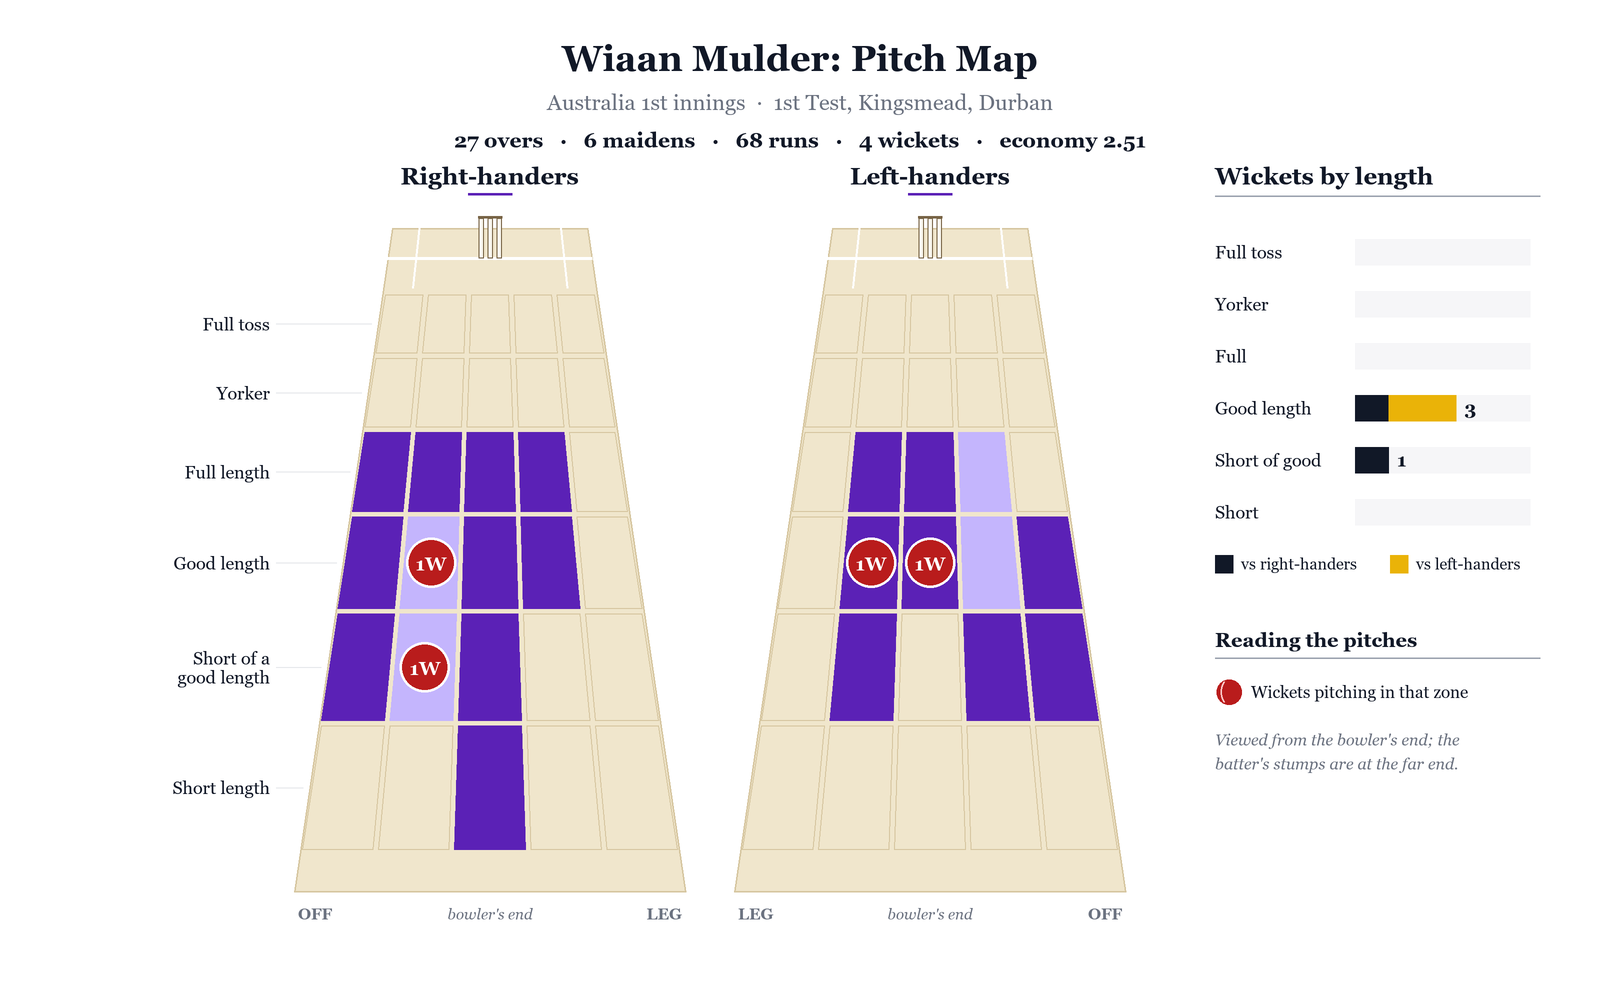
Anrich Nortje was also a sight to see in his first test match after over three years. He bowled some absolute snorters to the Aussies, and consistently hit the mid to high 140s. Nortje was a bit on the expensive side to start proceedings, but found better consistency after lunch, where he dismissed Alex Carey and Beau Webster in the same over.
The Aussie batters, on the other hand, would see a lot of starts that they failed to convert. Marnus Labuschagne looked set and a lot more comfortable at the crease than he has been over the last few years, but lost his wicket on the last ball before lunch to one that jagged back from Mulder. Smith also lost his wicket to one well outside off, soon after lunch, after making a good-looking 25.
South Africa’s pacers weren’t perfect with their lines, often veering down leg and leaking easy runs. Jansen, in particular, started off the day poorly, conceding four byes off the first ball of the series. Mulder, too, often drifted down the pads against the right-handers. But the Proteas had little to complain about after a dominant Day 1, which could have seen them run through the Aussie batting lineup had there been better lighting.
The Unstoppable Renshaw
South Africa would have turned up on Day 2, ready to bowl Australia out for under 200, and may have done it had it not been for a record-breaking innings from Matt Renshaw.
The left-hander ground out the day, facing a massive 397 balls to score 190 runs, his best test score and first century in over 9 years, a testament to his perseverance and hard work between being dropped and re-selected.
Except this innings wasn’t flashy or eye-catching whatsoever; there were no rash shots or aggressive pulls. Renshaw played within himself for 397 balls straight, using only high-percentage shots and leaving the ball incredibly well.
He took blows from Anrich Nortje at 140, but still didn’t budge. It was poetry in motion, watching Renshaw leave, manipulate the field, reverse sweep against the spinners, and save Australia from a game-losing situation.
Take a look at Renshaw’s Wagon Wheel for the 1st innings. The southpaw only played one shot in the V against all of South Africa’s pacers, coming off an on-drive against Nortje. He relied on scoring square of the wicket, playing the ball late and picking the gaps in front of or behind point, or punching off the back foot to steal a single.
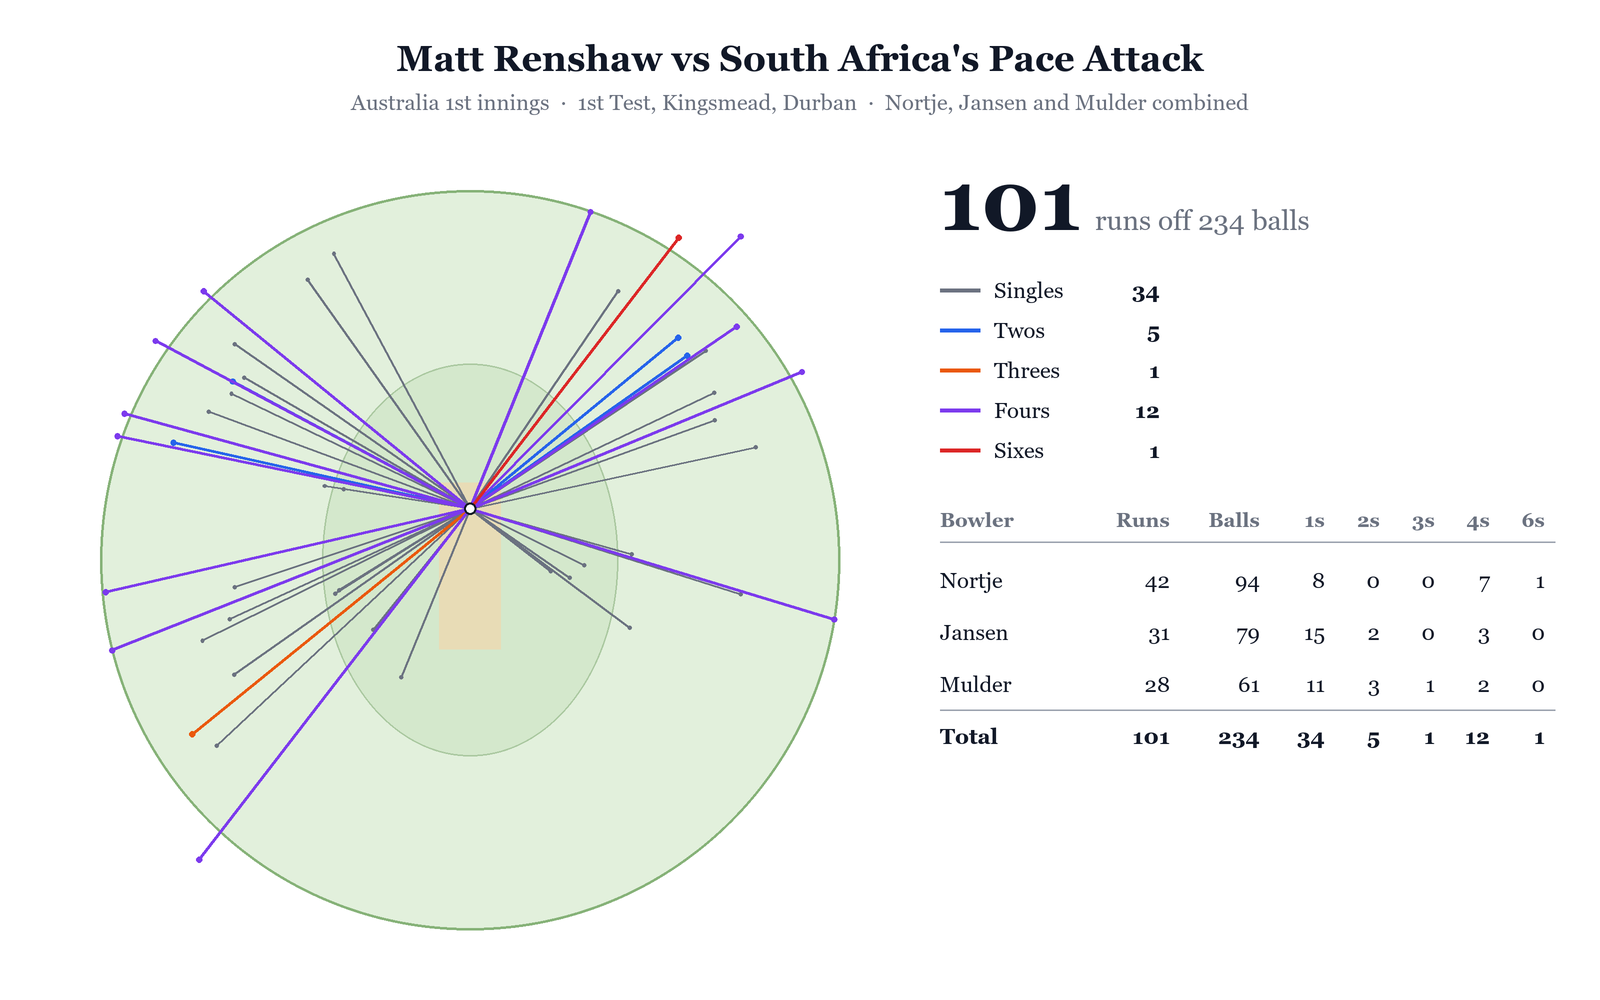
His most impressive feat in this innings was how disciplined he was in shelving the pull shot. Anytime the pacers resorted to short ball spam, Renshaw was more than happy to leave, or play the occasional ramp down to third man, and steal easy runs.
Against the spinners, his game plan was even more apparent. He backed his sweeps and reverse sweeps, and didn’t allow Maharaj or Harmer to stem the flow of runs on either end. Renshaw was especially positive against Maharaj, scoring 41 off 57 balls with 5 fours.
Of course, Renshaw did all of this while batting with the tail, scoring the most runs while batting with the tail in a test innings, at 174. He overtook Virat Kohli’s 2016 innings at the Wankhede, when he scored 171 with the tail, against England.
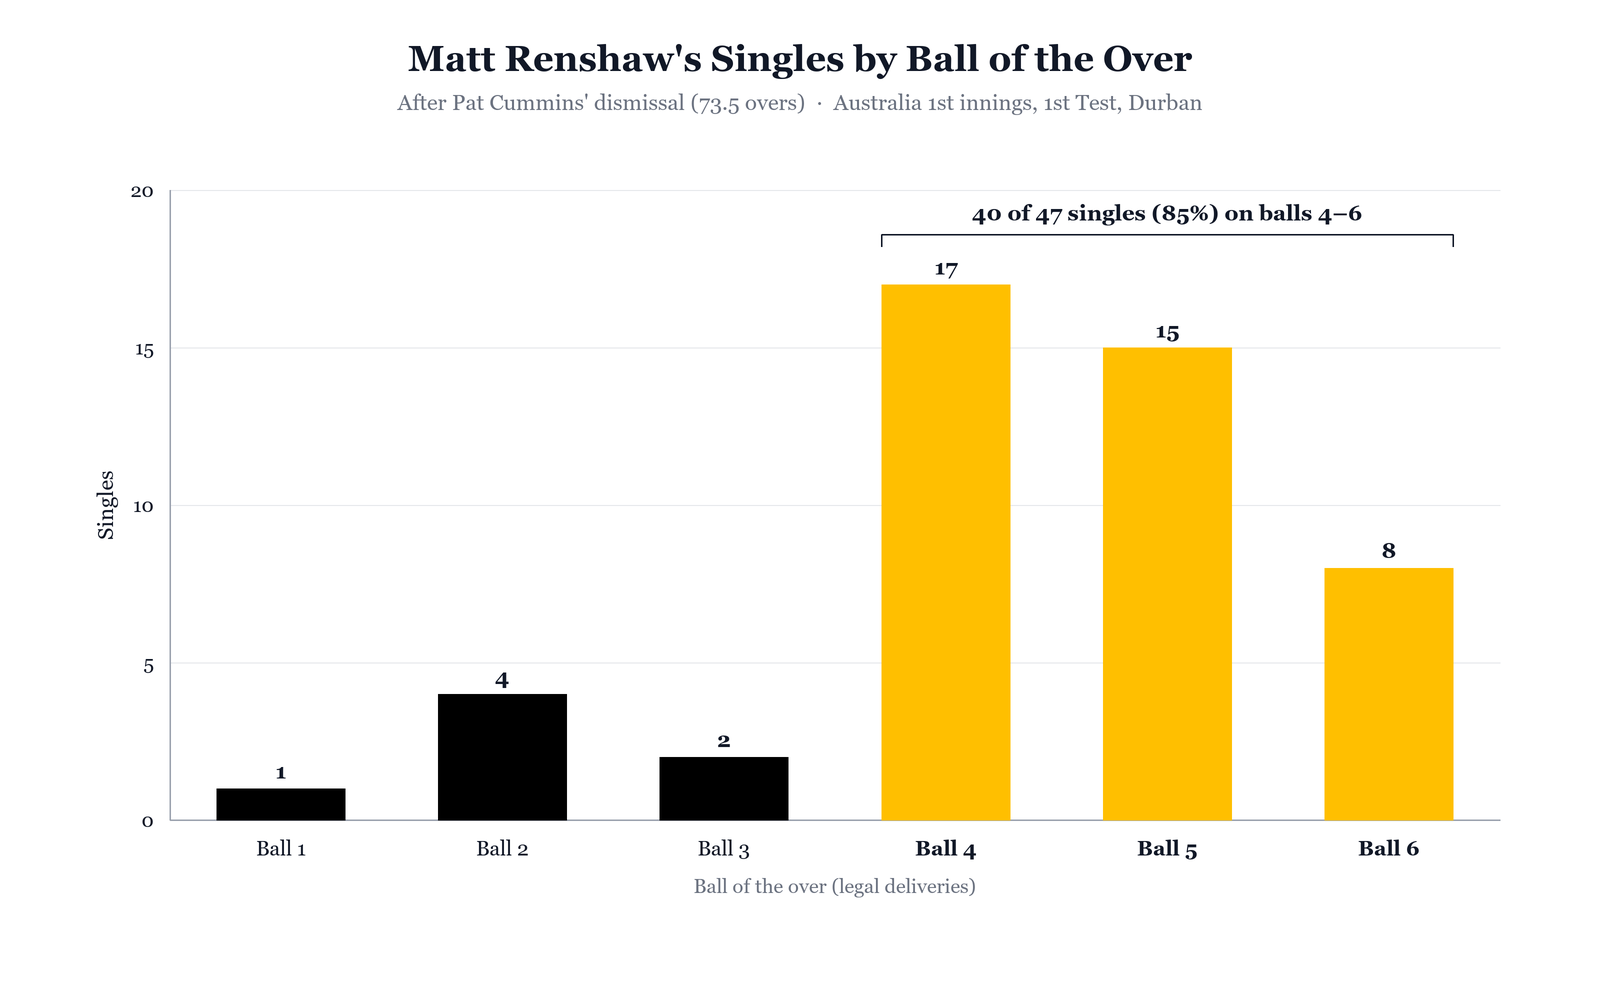
Pat Cummins and Nathan Lyon deserve tremendous credit, too. They battled it out for 98 and 92 balls apiece, and gave solid support to Renshaw at the other end. But Bavuma and co. didn’t toy with the field at all; they allowed Renshaw to hog the strike, soak up the pressure, and rotate strike on ball 4, 5 or 6. After the wicket of Pat Cummins, 85% of Renshaw’s singles came on balls 4, 5, and 6.
No team at Kingsmead has ever lost a test after making over 350 in the 1st innings. Australia finished with 390.
If anything, Renshaw looked even better in the 3rd innings, with his 82 off 99. Once again, he played an innings perfectly tailored to the situation, picking his matchups against Maharaj, against whom he hit 25 off 19.
And as if to top it all off in Renshaw’s dream test, he picked up two wickets in the 4th innings, including the wicket of Temba Bavuma, South Africa’s captain, to one that drifted and caught the skipper’s glove.
Impatience
South Africa’s batters won’t be happy with the fight they put up in this test.
Within the second over of the 2nd innings, Ryan Rickelton was caught flashing at one well outside off, on just his third ball.
Markram and Bedingham built a promising 84-run partnership, eating into Day 3, but things fell apart for South Africa once Bedingham lost his wicket.
Of all of South Africa’s batters, only Bavuma and Rickelton faced fewer than 20 balls and scored fewer than 10 runs. 9 other batters got off to somewhat of a start, with 7 of those 9 scoring over 25. Still, none of them could pile on a big innings, with Bedingham leading the pack at 49. Perhaps the rust was showing, as the Proteas were playing their first test match in nearly a year. Still, you would expect more application from this lineup.
Australia were clinical throughout the game, but particularly in this innings. Steve Smith was sensational with his game sense, anticipating two separate reverse sweeps to claim the wickets of Bavuma and Verreynne. He also took a brilliant one to his left to dismiss a well-set Bedingham.
Simultaneously, though, four of South Africa’s batters fell to the exact same trap: forcing a pull shot against the Aussie pacers, and sending it straight up. An obvious ploy, that the batters themselves saw coming, but still couldn’t resist the pull shot, and that was the difference this game. Renshaw’s discipline against the South African batters’ impatience.
If it wasn’t for South Africa’s tail putting on another 87 runs, the hosts may have been bundled out for under 200.
Labuschagne's Twin-37s
The Durban test saw one of the most unique records in test history; Marnus Labuschagne became the first-ever player to be dismissed on identical scores in both innings, while scoring at least 20 in both. Both times, he racked up exactly 37 off 58 deliveries before being dismissed.
Labuschagne has made an interesting change to his technique of late. He’s almost become scared to nick the ball, and shuffles across the stumps far more to avoid this, in an almost Steve Smith-esque fashion. But this brings in the LBW, which is exactly how he got out in the 1st innings, trapped plumb to Wiaan Mulder.
Still, though, Labuschagne looked a lot more confident at the crease in these two innings. His feet were moving, his head was more still, and particularly in the 3rd innings, he picked gaps with ease and scored fluidly. This is undeniably a massive series for Labuschagne, but his two cameos in the 1st test do inspire confidence.
Nic Maddinson
Nic Maddinson is the only real question mark for Australia ahead of the 2nd test. Does he retain his spot? He managed a painful 33-ball duck in the 1st innings, but smashed 48 off just 38 in the 3rd, relieving immense pressure in his comeback test.
That’s precisely the role Australia want Maddinson to play as well: someone who can counterattack and ease the pressure on the other batters. I see Australia sticking with Maddinson, at least for another test.
Lack of Intent
The fact that Maddinson’s innings flourished like it did brings me to my next point. South Africa almost looked toothless in the 3rd innings, willing to “wait out” the Australian batters until they gave their wicket away. They knew the Aussies would bat with intent, and the bowling attack may have missed a trick or two in capitalizing on their over-aggression early on.
Marco Jansen in particular seemed to have little concern for building pressure slowly and methodically. Every ball, he ran in almost trying to produce a magic delivery and pick a wicket out of thin air, expecting that the bowler at the other end would keep things tight.
This goes to show how much South Africa were missing Rabada. They needed their star bowler to steam in and hit a length as he does so well, applying constant pressure from one end. Without Rabada, South Africa’s talented and versatile attack looked disorganized, and at times, harmless.
On the other side, the Australian cartel looked stronger than ever, even with Mitchell Starc misfiring at first, as he battled with the footmarks and often ended up bowling around the wicket.
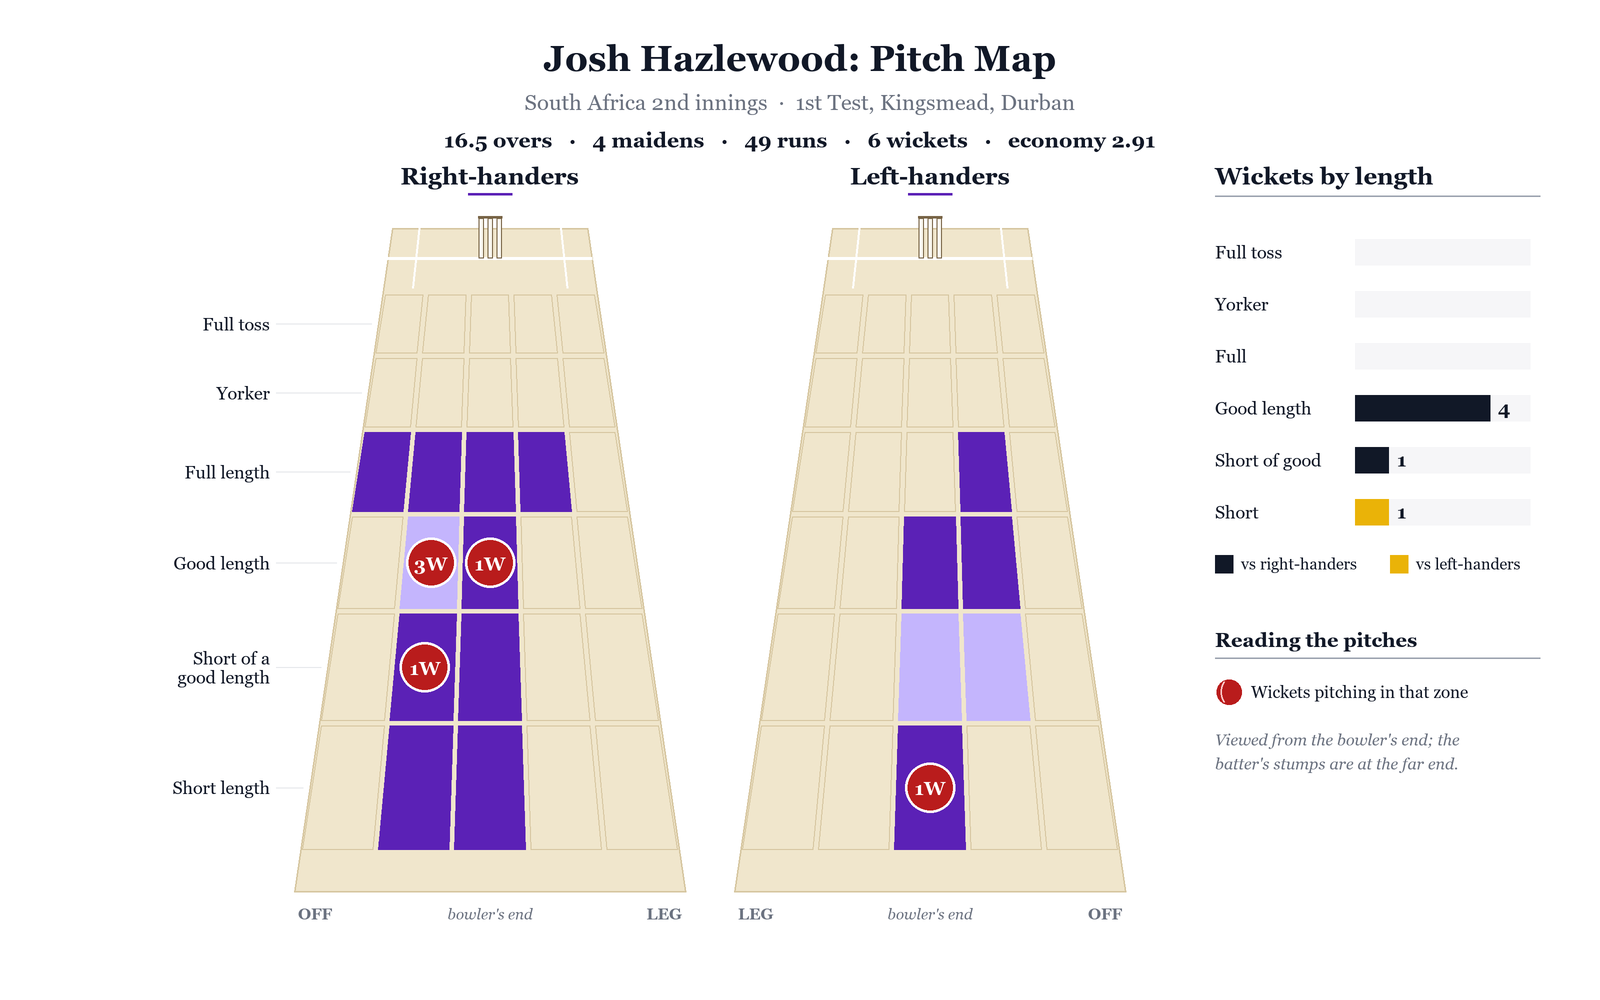
Still, the cartel dominated, with the quartet sensing the big moments and raising their game when it mattered most. Josh Hazlewood’s spell in the 4th innings was a thing of beauty, where he bowled consistently on the stumps and in the channel, with very few straying down leg side, unlike the South African pacers. He certainly reaped the rewards for his consistency, putting up his best figures in a test innings with 6 for 49.
2nd Test Preview
Where does this leave us for the 2nd test in Gqeberha?
The big positive for South Africa would be Kagiso Rabada, who seems to be fit and firing in training, having bowled full-tilt in the nets. KG left a noticeable hole in the Proteas’ attack in Durban, and will make a world of difference when he returns. Don’t forget that the last time Rabada faced the Aussies in Gqeberha, he finished with 5 for 96 and 6 for 54 across both innings, getting into the heat of the battle and walking away as Player of the Match.
But the hosts have interestingly shuffled their deck a bit more than that. Head coach Shukri Conrad announced that Tristan Stubbs has been dropped for Matthew Breetzke, with Ryan Rickelton confirmed to take the gloves in the next test. While Stubbs is unlucky to miss out, I think the Proteas have made a few right calls here.
Rickelton donning the gloves means he must be moving down to the middle order, which leaves an opening slot up for grabs, while Verreynne will likely be left out. I would expect Marques Ackerman to finally get his chance here, ideally slotting in at No. 5, closer to where he would feel most comfortable. That would mean South Africa will have to throw Matthew Breetzke in the deep end, to open with Aiden Markram. This call is a bit of a gamble, but riding his red-hot ODI form may not be a bad idea given the circumstances.
In terms of the bowling lineup, you would expect the Proteas to bring in an extra pacer, which likely leaves Simon Harmer making way for Rabada. That leaves the rest of the side unchanged.
Australia look a lot more set with their XI, and should go into the 2nd test unchanged, giving Nic Maddinson another crack at it.
The last time Australia toured South Africa, the series followed a similar pattern: a crushing loss for South Africa in the series opener, at Durban. 8 years later, can the hosts turn it around and make it 1-1?