October 23, 2026
SA vs AUS 2nd Test Review
Australia had South Africa 110 for 6 at Gqeberha, and still lost. We break down Boland's blitz, Bavuma's career-best 179, the Jansen and Harmer partnerships, Australia's 99 all-out, and what it all means for the decider at Newlands.
Introduction
Australia have just bottled a test from an unlosable position. Yes, one of the most successful Australian teams in history had South Africa at 110-6 in the first session of Day 3, after the first two days were effectively washed out, and still managed to lose the game.
This win will go down in history as one of the bravest and most commanding performances from South Africa, snatching a test win to level the series 1-1 heading into the finale at Cape Town. Temba Bavuma led from the front and restored his winning ways as captain, in the most convincing fashion, and South Africa now head into the 3rd test as favorites.
Where did Australia lose the plot?

Boland's Blitz
Australia started this test with a bold selection call: dropping Nathan Lyon for Scott Boland, to feature a four-pronged seam attack. Given the green, grassy deck, and the overcast conditions we found in the first half of the game, it wasn’t surprising when Scott Boland found some rhythm in the first innings.
Boland was impressive as always up front. In just his second over, he set up Markram beautifully, with three consecutive balls slightly back of a length that Markram left alone, before the fourth ball just a touch fuller that invited the batter into a drive, seamed in, and sent his middle stump cartwheeling. David Bedingham came in next, and had just seen his teammate get cleaned up by one that seamed in aggressively, so when Boland pitched the ball at nearly the exact same line and length, Bedingham felt the need to prod at it, but it nipped slightly away and takes the batter’s edge. With two nearly identical deliveries, Boland cleaned up South Africa’s two most in-form batters from the 1st test.
Skipper Temba Bavuma walked in on a hat-trick ball against Scott Boland on this green deck, and Boland nearly had a third if it hadn’t been for an inside edge. The bowler seamed it in viciously once again, just glancing Bavuma’s bat before crashing into his pads with the last ball of the over.
Debutant Marques Ackerman joined Bavuma in getting South Africa to the close of play at 20-2 on Day 1, but the danger didn’t end on Day 1. Once again, over half of the day was washed out, but we saw Boland unleashed in the third session.
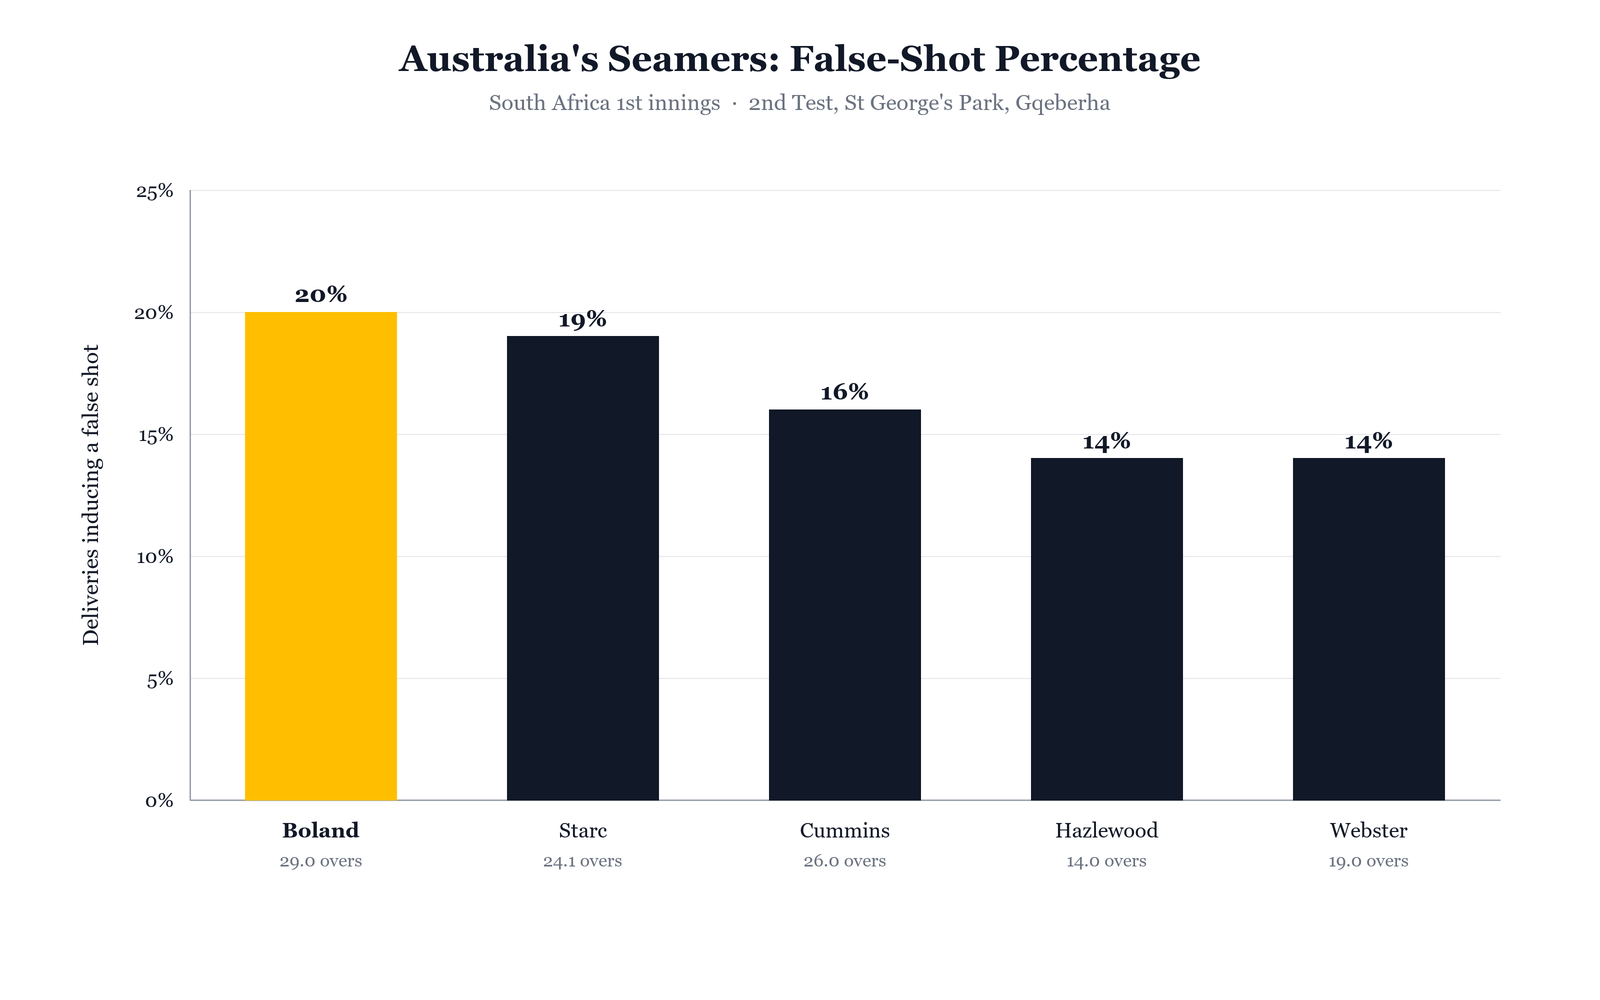
The seamer induced a false shot in 20% of his deliveries, the most by any of the Aussies in the first innings. He bowled 41% of his deliveries on a good length, and held the off-stump line with remarkable consistency, utilizing everything this surface had to offer.
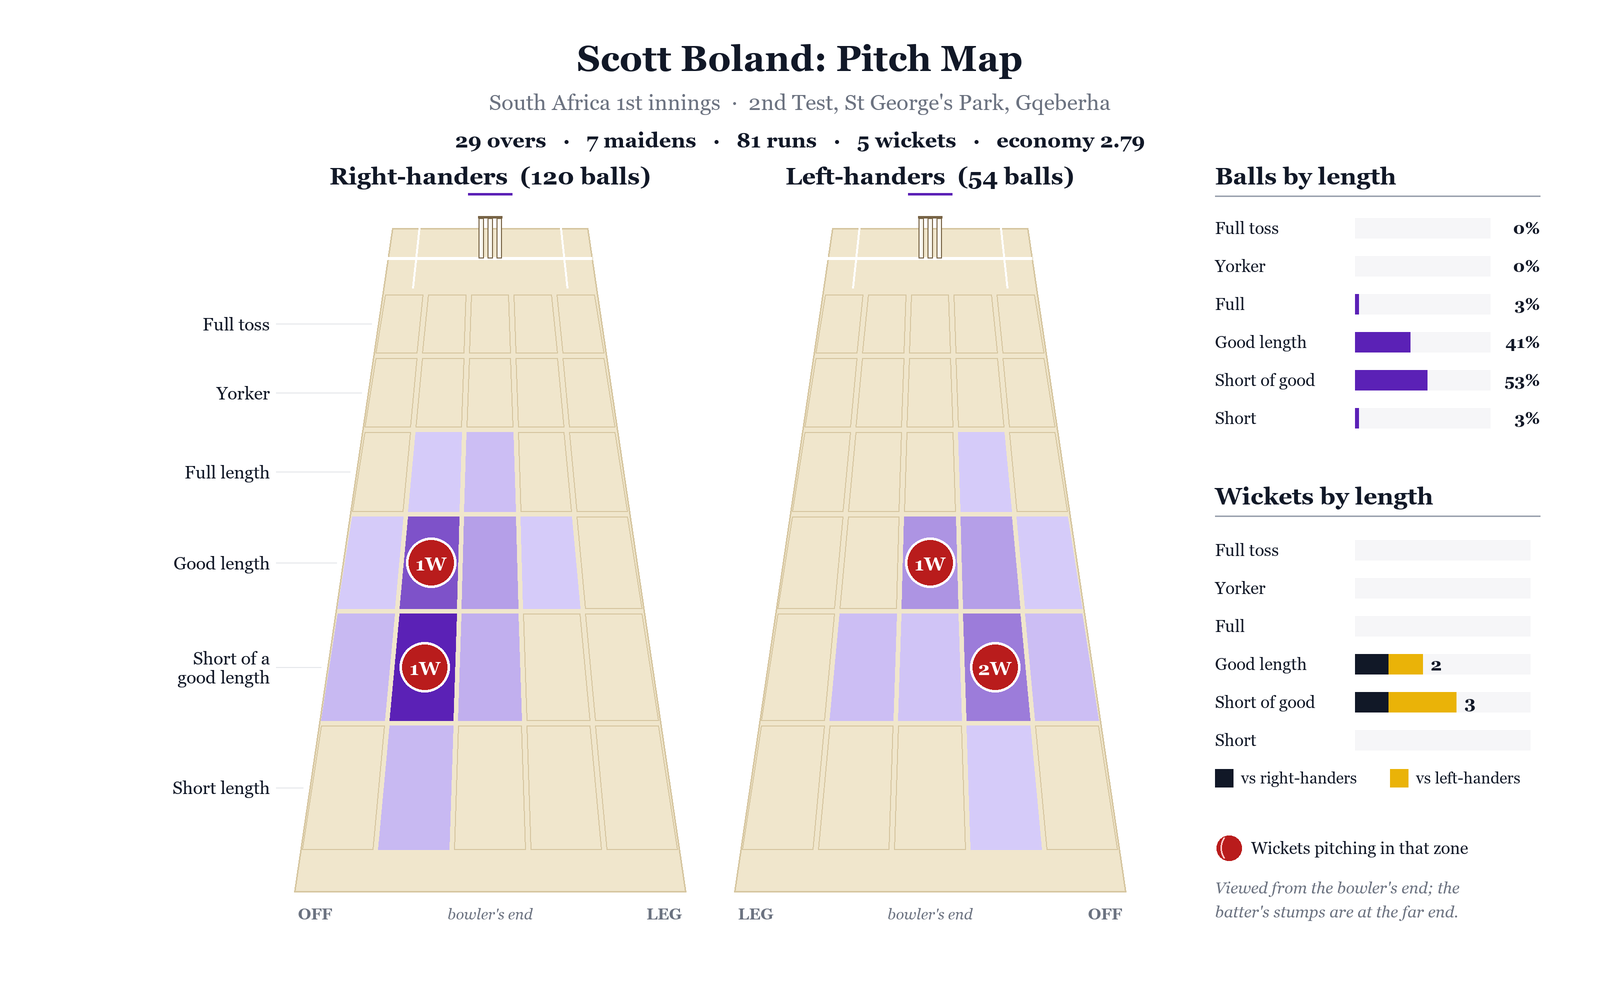
Boland’s finishing figures of 5-81 don’t look nearly as flattering as they should be, considering how unplayable he was for three consecutive days. That is where things turned around for South Africa.
A Captain's Knock from Bavuma
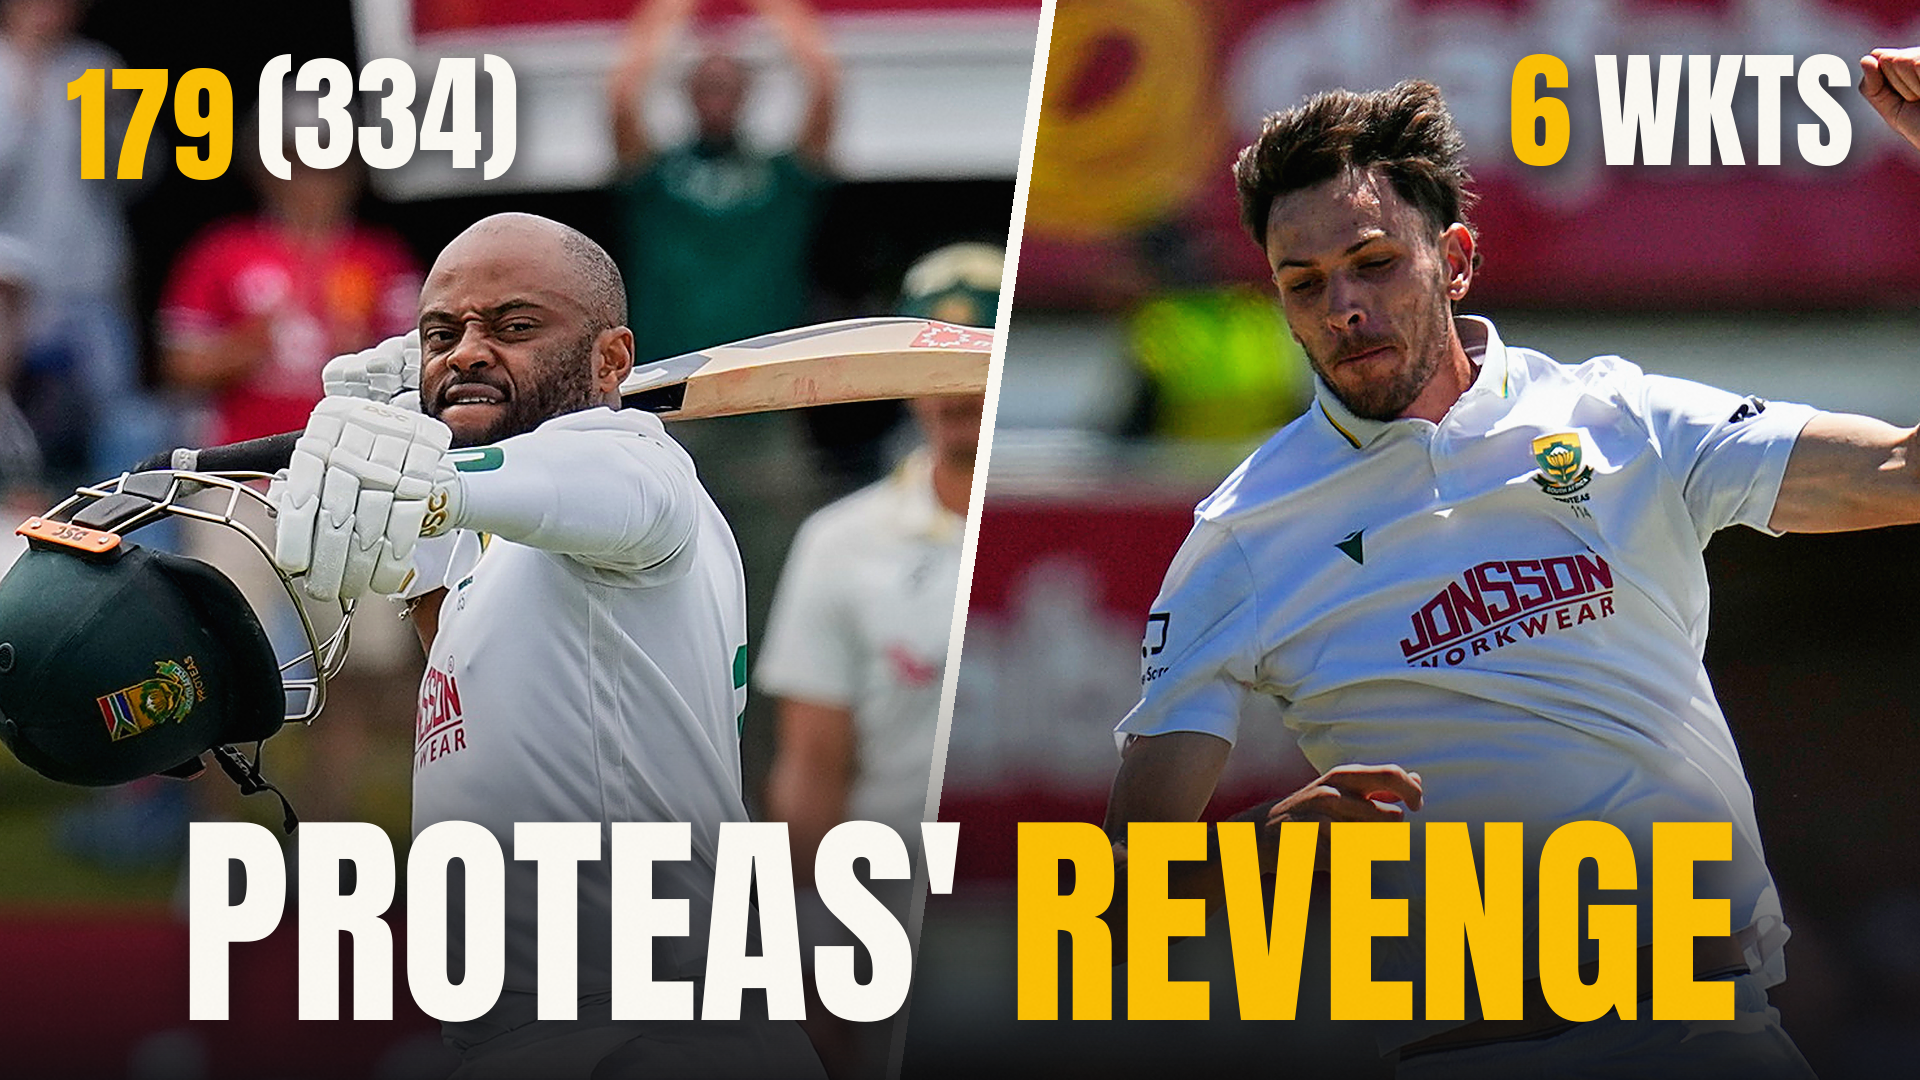
At 110-6 early on Day 3, South Africa were staring at a draw at best, if not a series loss. But Temba Bavuma stood tall, as he has done rather frequently over the last few years. Bavuma notched up his highest-ever test score, with 179 match-winning runs, in his fifth test century and first against Australia.
The aftermath of the first test saw Bavuma on the receiving end of a lot of criticism on both his captaincy and batting. The skipper only saw that as fuel, though, and used it to register a career-defining innings, with everything on the line. The going was never easy for Bavuma. Even after negotiating his first ball, Boland’s hat-trick ball, he struggled to score fluidly. His first boundary came from a thick outside edge that raced between the slips. At the other end, he had no stability. Ackerman went early on Day 2, followed by Breetzke, and Rickelton after a small partnership.
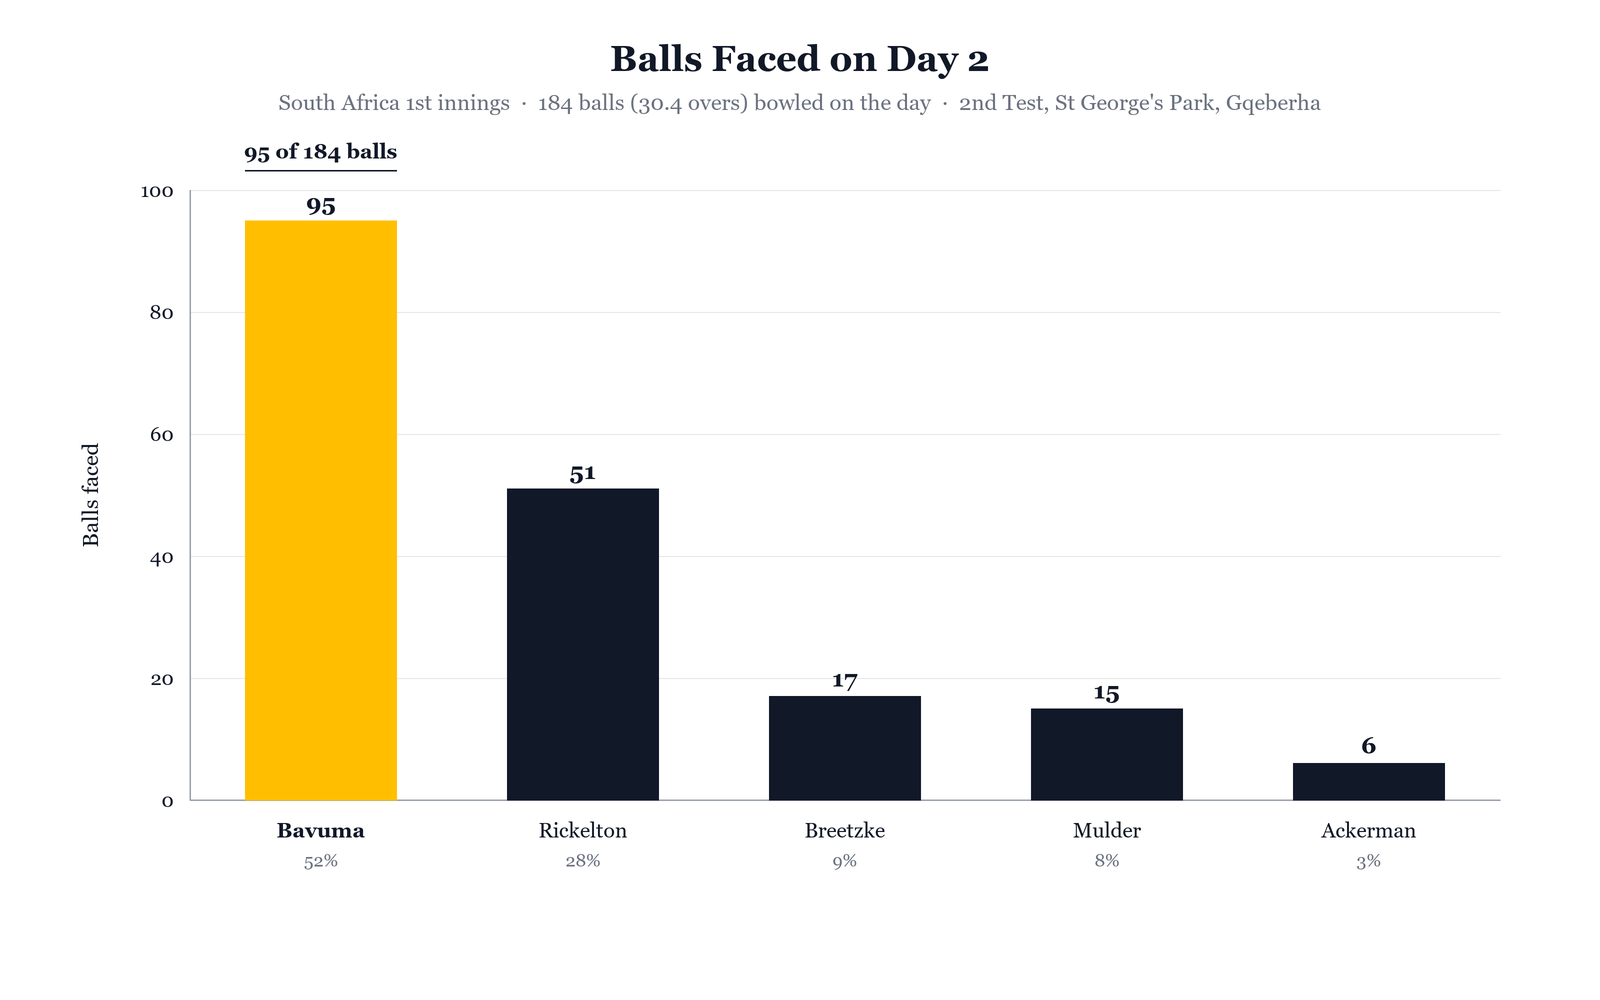
Bavuma was masterful at soaking up the pressure, though. Look at when he scored his runs. On Day 2, he scored just 37 runs from the 95 balls he faced. Day 2 only saw a total of 184 balls, a little over 30 overs, and Temba Bavuma faced 52% of them, more than the other four batters combined.
Ironically, one of his most impressive shots actually came on the same day: a clean hook shot off Pat Cummins which sent the ball onto the streets of Gqeberha for a maximum.
There was a clear shift in momentum once Marco Jansen arrived at the crease, early on Day 3. The sun was shining, the surface had eased, and Bavuma and co. didn’t hesitate to cash in.
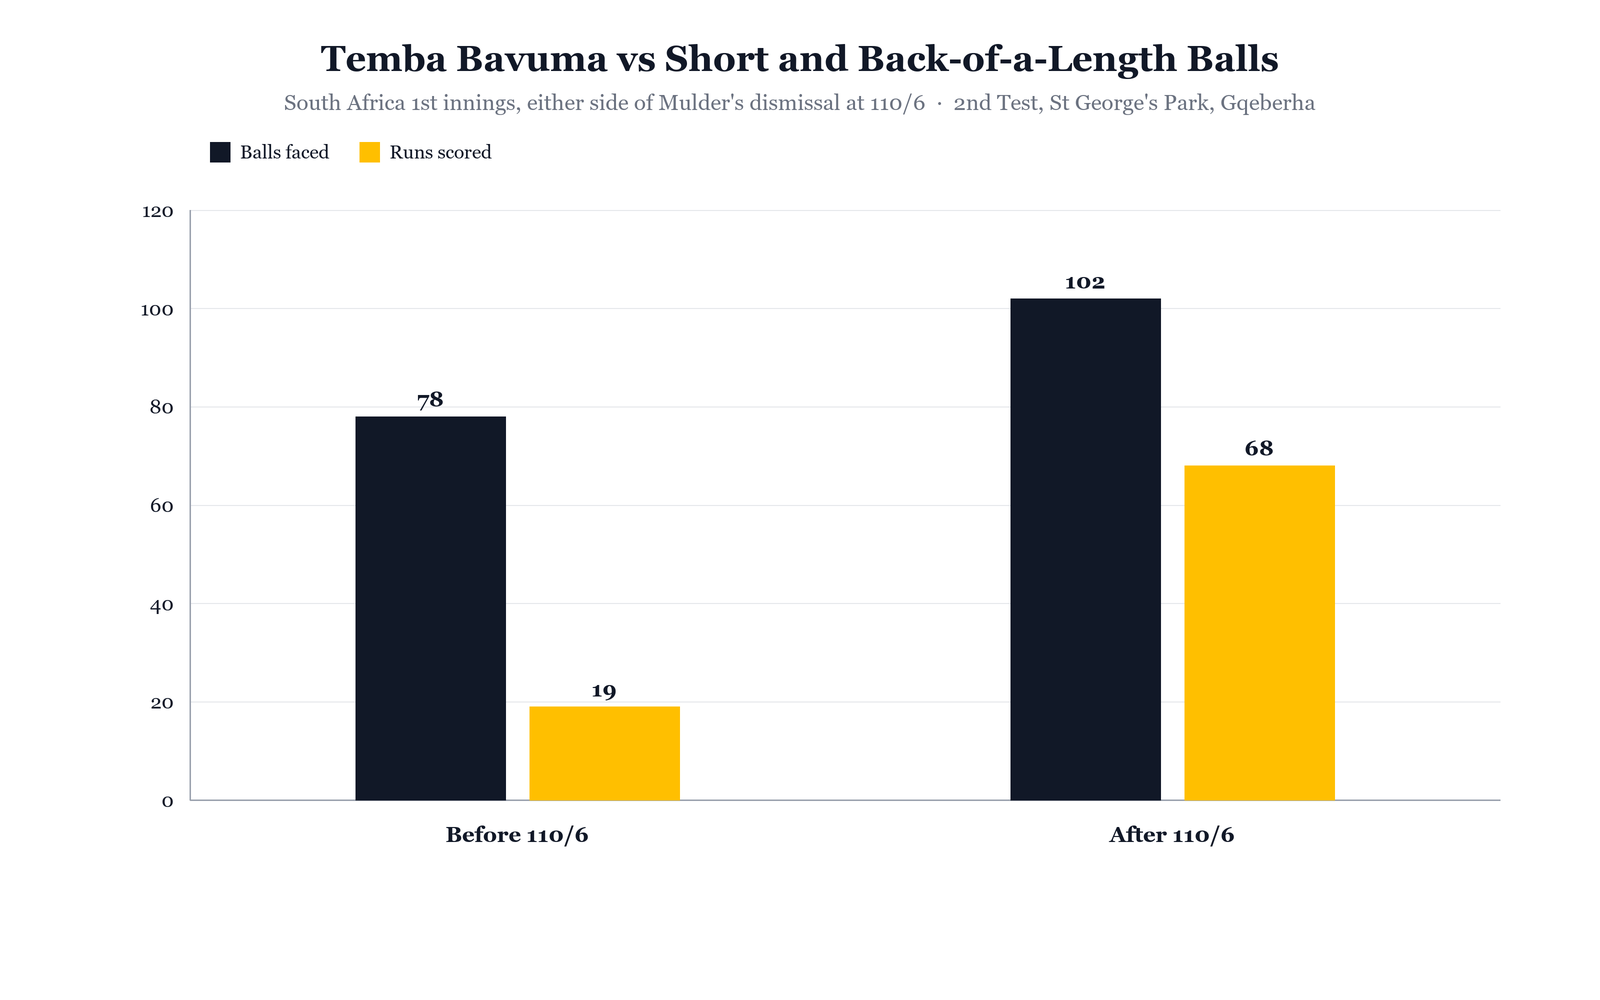
Until the wicket of Mulder, Bavuma was safe against the short ball, scoring just 19 off 78 back-of-a-length deliveries. However, in the second half of the innings, he showed a lot more positivity and backed his pull shot, scoring 68 runs off 102 back-of-a-length deliveries, including the shot that brought up his century.
The grit and determination Bavuma put on was central to South Africa’s comeback. He put the team on his back and showed the world how it’s done, lifting the dressing room all on his own. This will undeniably go down as the innings of Bavuma’s career thus far.
Jansen & Harmer's Resistance
Bavuma’s innings would have looked very different had Marco Jansen and Simon Harmer not batted the way they did on Day 3.
Marco Jansen came in and quadrupled the tempo of the game, scoring a half-century in just 43 balls. He finished with 85 off 100 after an impressive grab from Travis Head, but his contribution was a lot more than that. Jansen alleviated the immense pressure on Bavuma, and allowed the skipper to breathe easier at the other end, knowing the scoreboard was ticking.
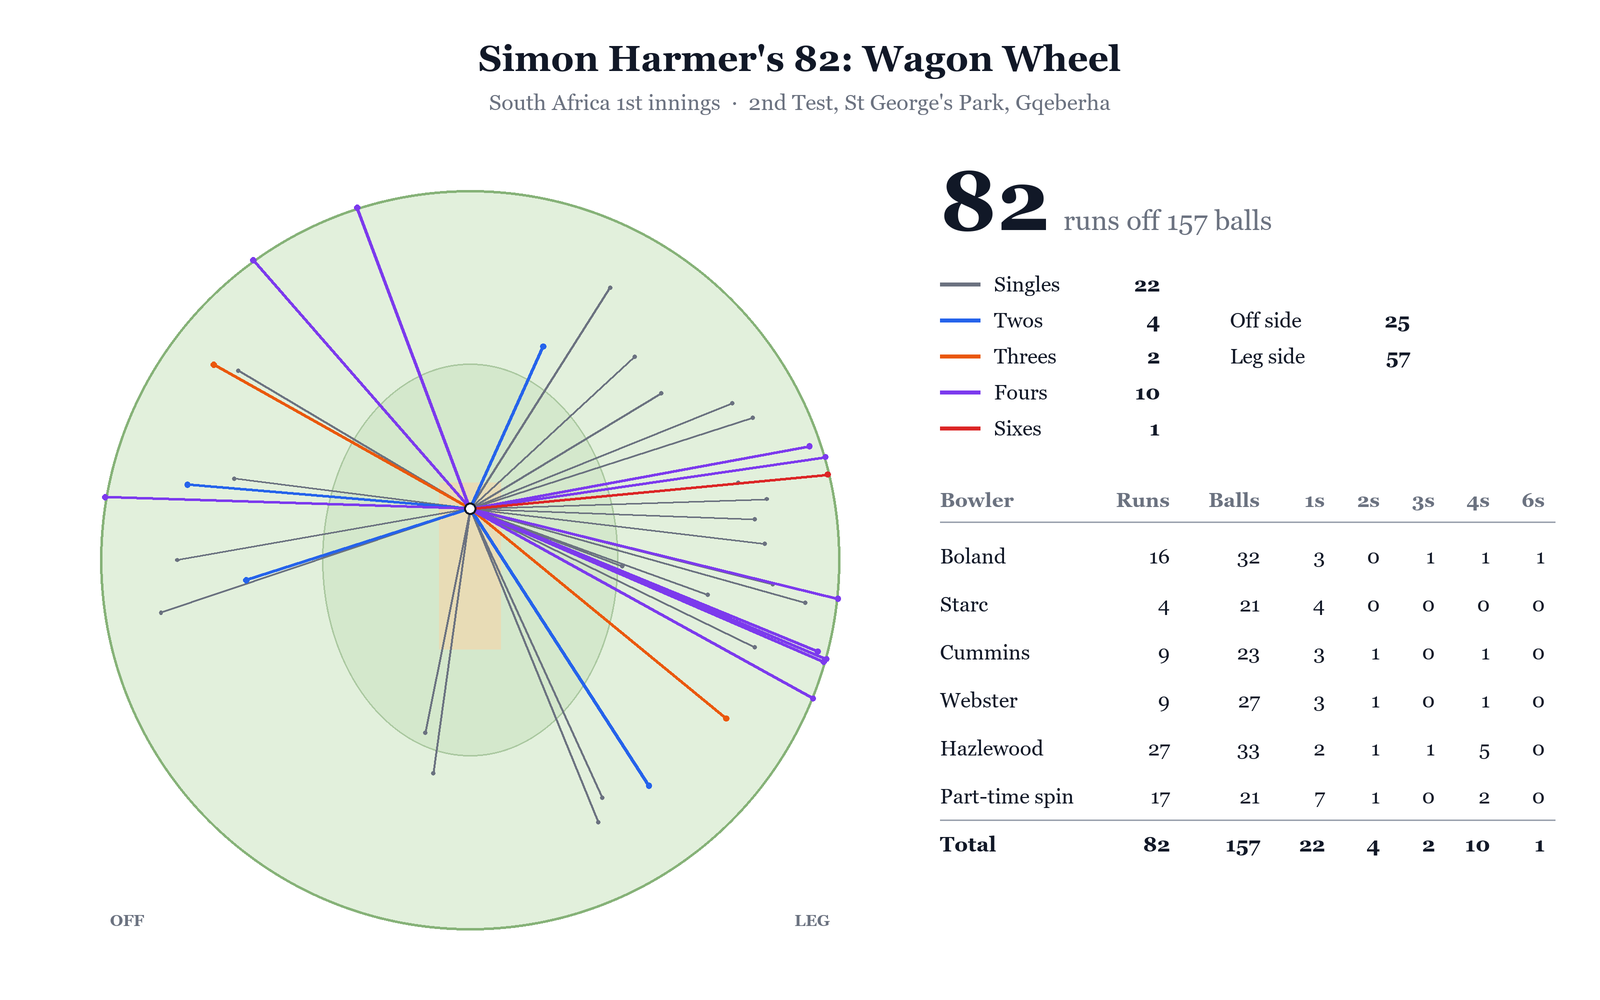
Simon Harmer, too, put up his first test 50 and highest score in test cricket. Harmer was smart in deploying his strengths, relying on scoring on the leg side, from where he picked up 57 off his 82 runs. His pull shot, in particular, came in handy, producing 31 of Harmer’s runs.
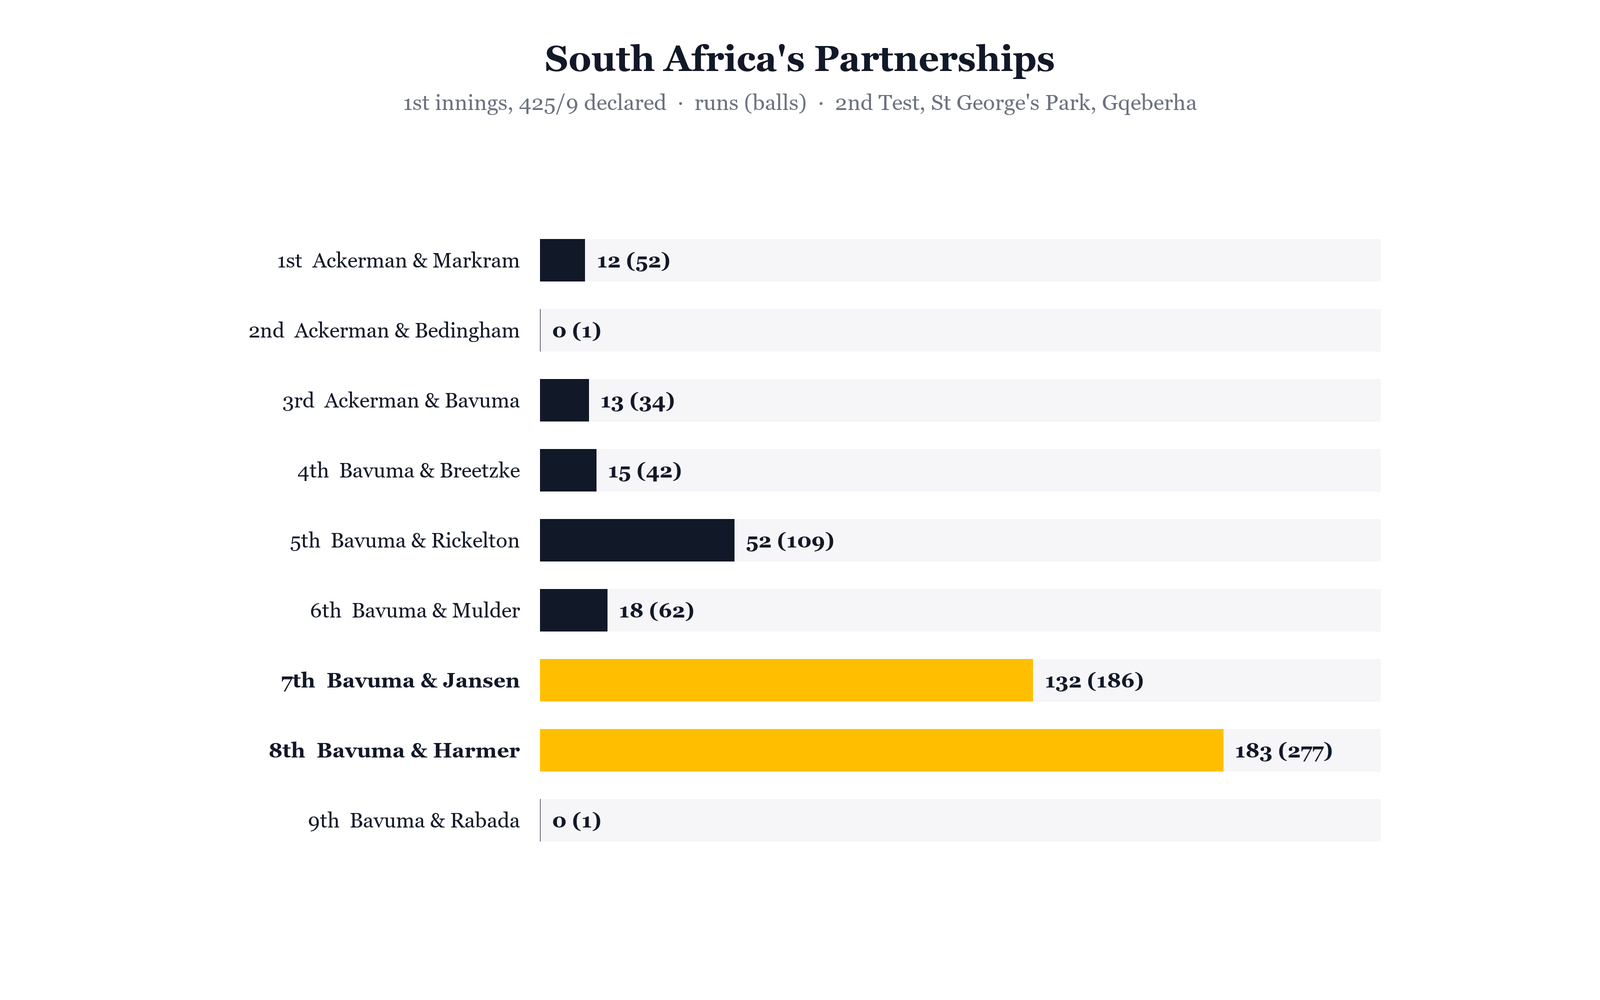
Bavuma put on 132 runs off 186 balls with Jansen, then another 183 runs off 277 balls with Harmer, the highest-ever 8th-wicket partnership for South Africa.
South Africa had reclaimed every ounce of momentum in the game. The only question was: had they declared too late?
99 All-Out
Despite a record-breaking first innings against all odds, the pressure was still on South Africa to seal a victory. Critics claimed Bavuma took too long to declare, and that the game would cruise to a draw. Within the first over, though, a blazing Kagiso Rabada claimed the wicket of Nic Maddinson, in his first over since injury.
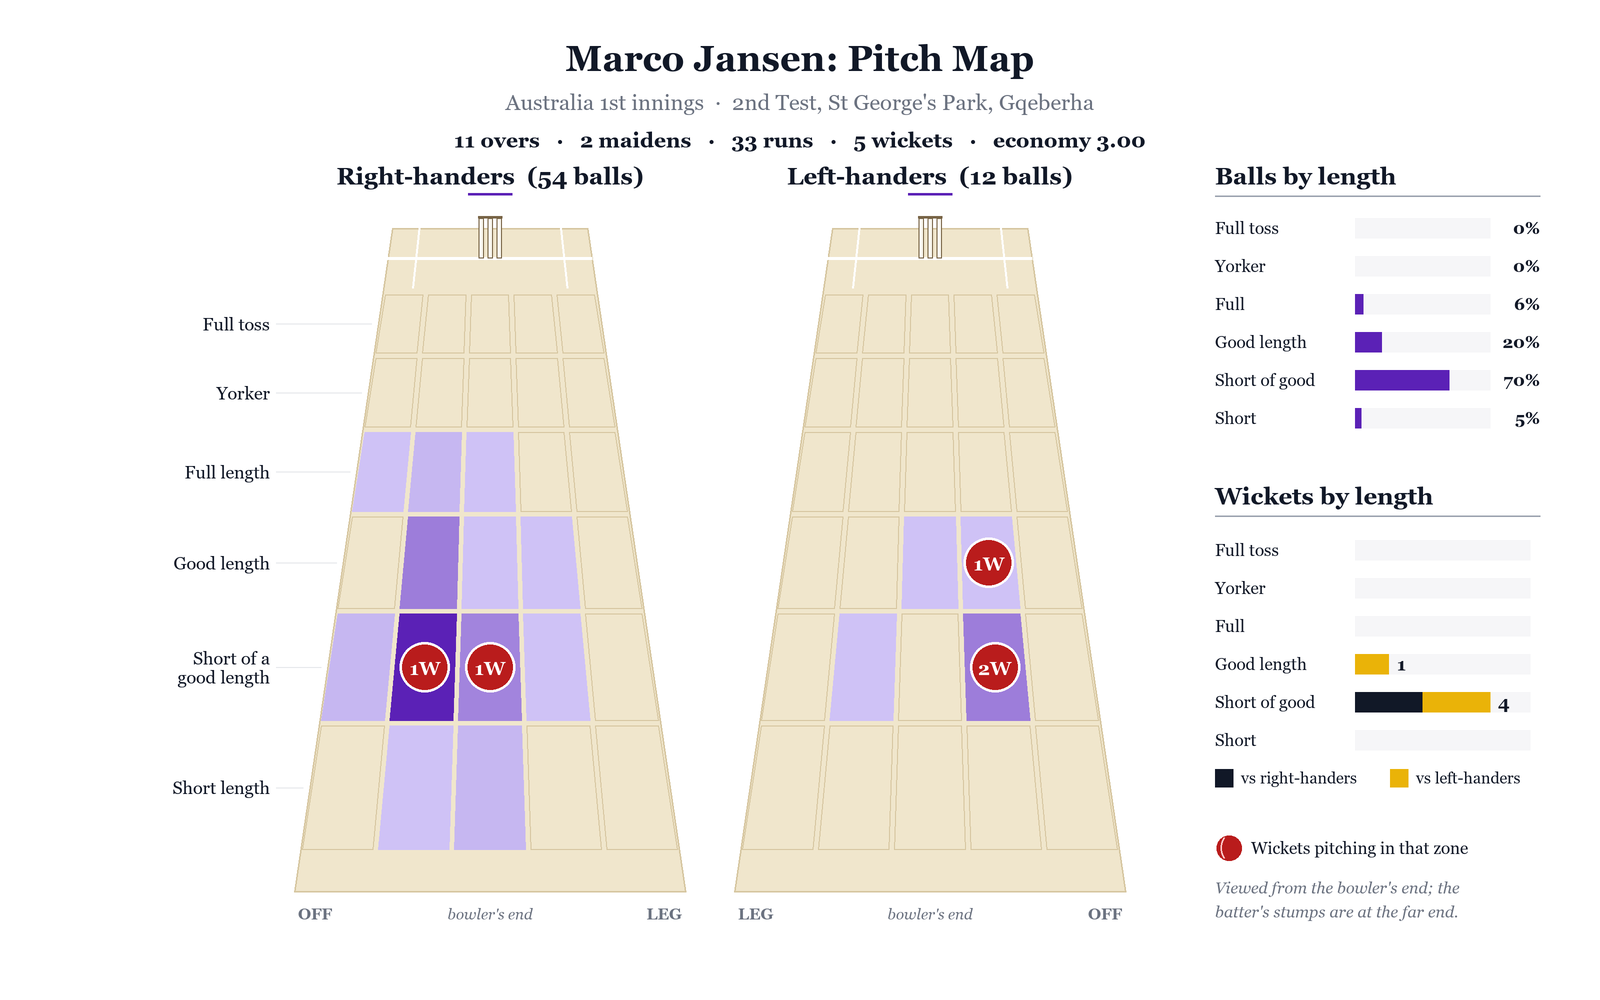
Day 4 is where everything fell into place for the hosts, and fell apart for the visitors. Jansen spearheaded the attack that ripped through Australia in just 42.3 overs, for just 99 runs. The left-armer finished with 5-33 in his 11 overs, most of which came from the same formula. 70% of Jansen’s deliveries were back-of-a-length, and he induced 33% false shots from the Aussies. His most impressive burst came when he ended the 94-ball partnership between Matt Renshaw and Steve Smith, getting Renshaw caught behind, and then claiming Alex Carey just two balls later.
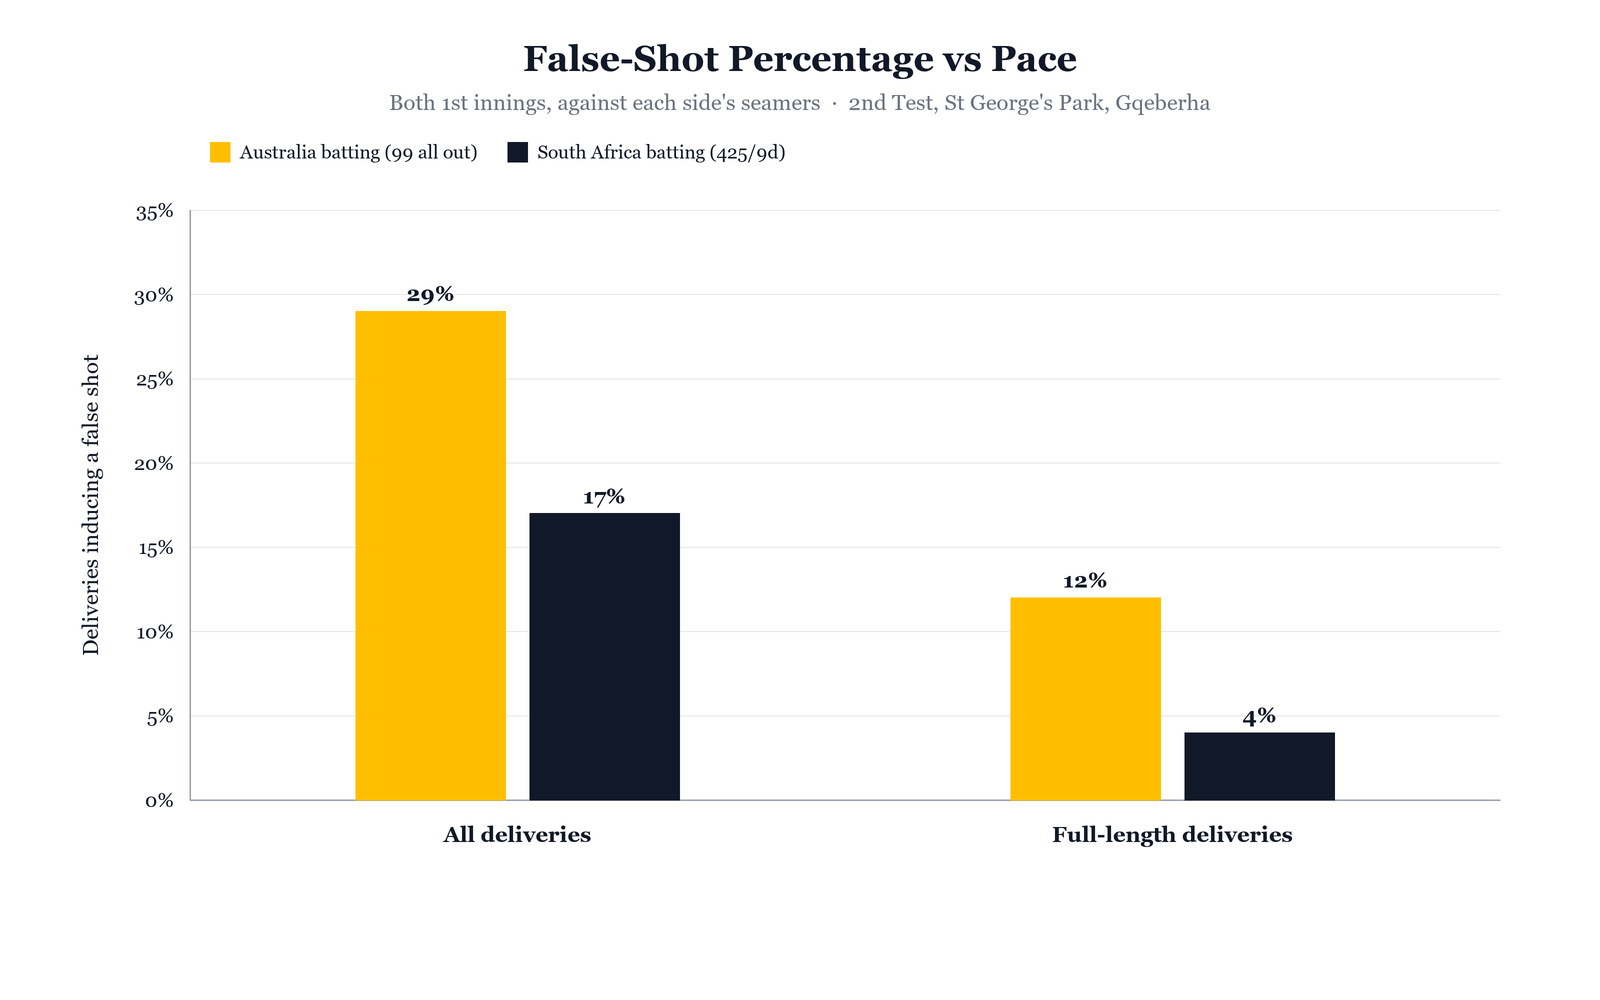
The Australian batters’ application in their first innings was nothing short of dismal, especially considering the pedigree of this lineup. They finished their 99-run innings with a 29% false-shot percentage, compared to South Africa’s 17%. Against fuller length balls in particular, they forced 12% false shots, eager to feel bat on ball, compared to South Africa’s conservative 4% at the same length.
Steve Smith did end up crossing 11,000 test runs, but his 28 runs were the highest score for Australia. They opened the doors for South Africa to snatch a victory, and allowed the Proteas to sink their teeth into this game.
The Follow-On
South Africa enforced the follow-on as expected, and their attack had its tail up. Rabada cleaned up Maddinson once again in just the third over, and was bowling absolute gas, clocking in at a top speed of 155 km/h.
Travis Head showed some fight at the other end, and finished Day 4 unbeaten on 83. He took the attack to the opposition, and ensured that all the bowlers were punished if they overpitched the ball. Head ended up scoring his first away Test hundred, with 121 off 190.
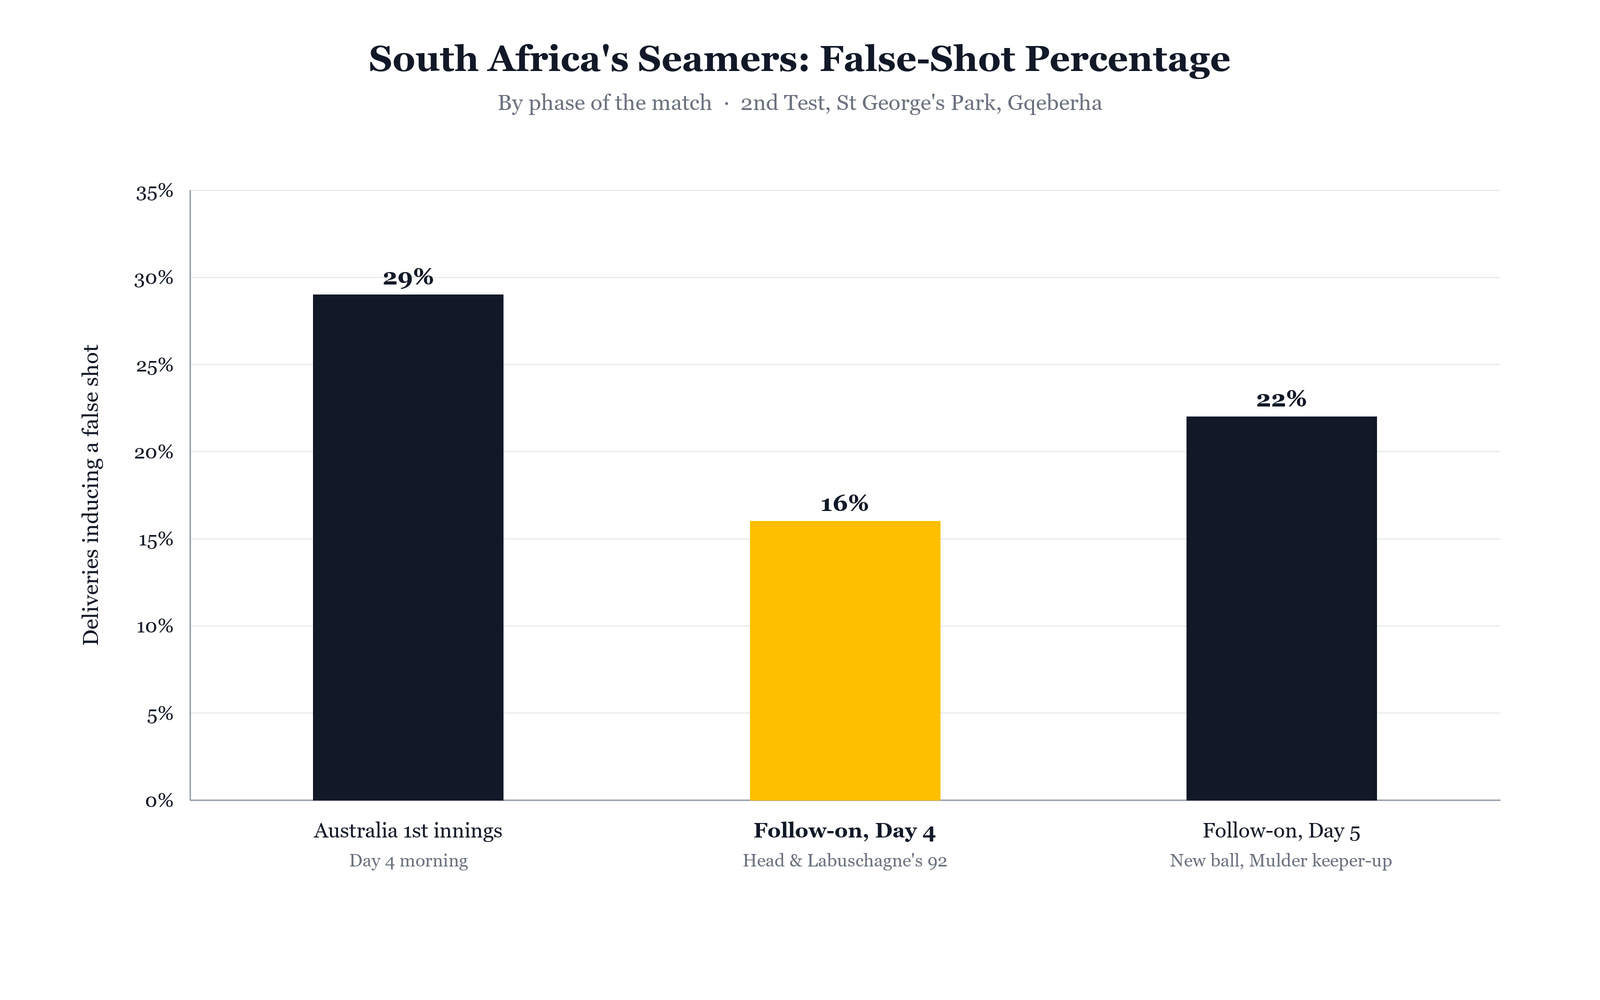
He was joined by Marnus Labuschagne for a 92-run stand, where it seemed like the Aussies could save the game. The duo nullified South Africa’s pacers, with only 16% false shots on the evening of Day 4, compared to 29% in their previous innings.
Labuschagne ultimately opened the gates for the Proteas. After a tentative review against an LBW from Simon Harmer, Labuschagne was reprieved by a matter of millimeters, and looked up to the skies, almost in gratitude for a second chance at playing for his career. Yet just a few balls later, he marched down the pitch against Harmer and tried to launch him over cow corner, against the strong winds at Gqeberha. Marco Jansen bagged a challenging catch, and Labuschagne was dismissed on 39. The shot selection from Labuschagne was questionable, to say the least. His game plan against the spinners seemed set on playing off the back foot at all costs, and it was working; he showed resilience against spin, until that LBW review. However, soon after his second life, he threw it all away with a poorly judged, low-percentage shot against Harmer that sent him back to the pavilion.
That’s the third 30+ score for Labuschagne in this series, which he has failed to convert into a notable or match-winning score. Given the context of his dismissal, this one will hurt the most, and lower the axe that hangs over his place in the side.
Renshaw and Webster weren’t much better, with loose wickets that gave South Africa even more control of the game.
The man who best stalled South Africa's flow of wickets wasn’t Steve Smith, it was Scott Boland, as nightwatchman for the second day in a row. Boland negotiated the pace well, and managed a fighting, career-best 40 off an unbelievable 166 balls faced. If there was anything the Aussies needed Boland to do in this game, he did it. He even managed a few stylish uppercuts against Rabada, leaving the dressing room shocked.
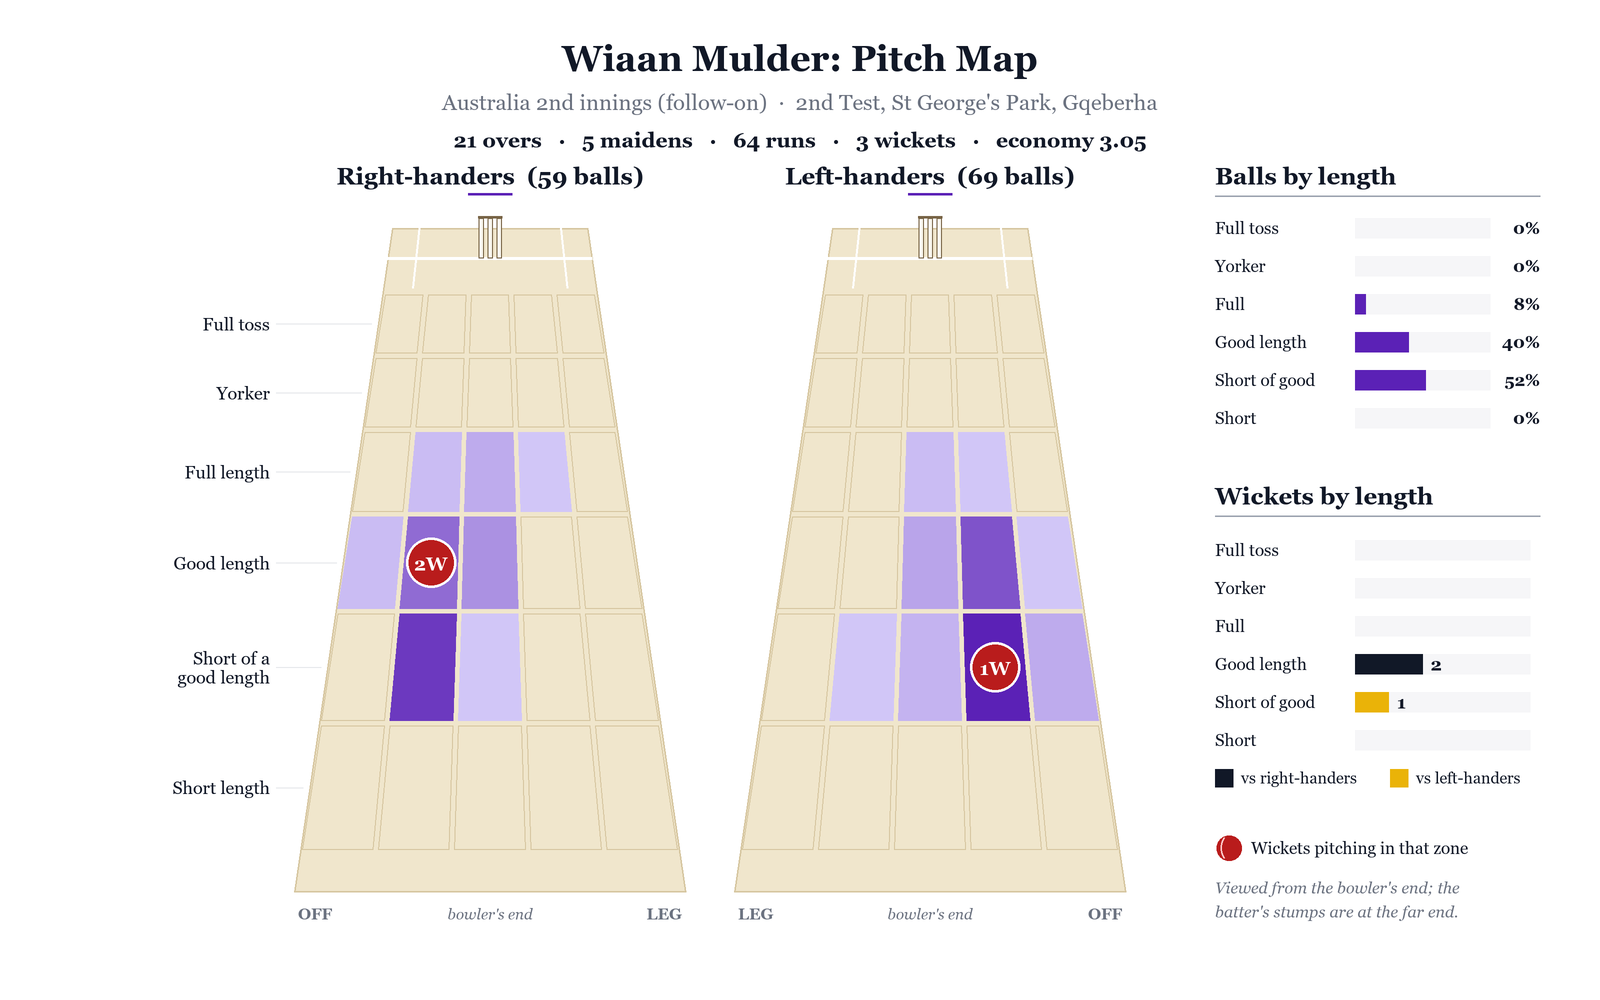
In the end, Wiaan Mulder brought it home for South Africa, the unsung hero of this victory. On Day 5, with Rickelton keeping up to the stumps, he held Travis Head within the crease, and eventually found him chopping onto his stumps. He maintained that line in the channel, and forced the batters to reach out for it while staying in the crease, which eventually claimed the wickets of Boland and Cummins as well.
3rd Test Preview
South Africa will be more than pleased with how they turned up in this test, with their backs against the wall. While Bavuma orchestrated their comeback, the lower order and bowlers all chipped in to secure one of their greatest ever wins.
Still, though, a few clouds loom over their camp. Anrich Nortje’s surprise injury will be a massive loss for them, if he has to miss out on the next test. Moreover, their top order doesn’t look any less fragile than Australia’s at the moment. Marques Ackerman looked tentative in his first outing in whites, and they will hope for him to find some comfort at the top of the order. Matthew Breetzke looked positive in his short stay, but was quickly picked off by Starc. The lower order bailed out South Africa much like it did for Australia in the first test, and they would hope for more runs from their batters in the next test.
The only change for South Africa would be to replace an injured Anrich Nortje if required. I would love to see them bring in Dane Paterson, who has the ability to nip the ball around and ask questions consistently. However, the Proteas may favor bringing in Gerald Coetzee for his first test in two years, to add that X-factor to their bowling attack.
Australia on the other hand has many more fires to put out. Many of the selection calls were left-field from the get-go, from bringing in Maddinson to persisting with Labuschagne, but their lack of direction is what is most concerning. Upon calling up Maddinson, they praised his ability to play spin and apply pressure in the middle order. Still, they played Maddinson as an opener in these two tests. Matt Renshaw was brought in as an opener to replace Jake Weatherald, but after just one innings at the top, he was pushed into the middle order this series. Above all, Marnus Labuschagne has now managed 14 consecutive innings without a 50, and hasn’t scored a hundred since 2023. After his dismissal in the 2nd innings, one would think the rope ends here for Marnus, but who can Australia actually bring in?
Cummins gave a positive update on Cameron Green and Josh Inglis’ injuries, so assuming their availability, Australia may look to bat Inglis at 3 for Marnus, and Green at 5, pushing Renshaw back to the top over Maddinson.
No matter the XI, it seems the Australian side is fighting a losing battle, and they will need a convincing win in Cape Town if they wish to shoo away the vultures that loom overhead.
Will the Proteas seal the series at Newlands? Or can Australia find answers to their innumerable questions?