November 1, 2026
SA vs AUS 3rd Test Review
Australia led by 100 on first innings at Newlands, and still lost by 176. We break down Cummins' toss gamble, Ackerman's 95, Starc's second-new-ball burst, Rickelton and Mulder's centuries, and Rabada and Harmer's Day 5 demolition, as South Africa sealed the series 2-1 and rose to Number 1 in the Test rankings.
Introduction
South Africa rise to the Number 1 Test team in front of a picturesque Table Mountain backdrop; a fitting setting, signifying the Proteas’ steep climb to domination in red-ball cricket.
After 15 days of top-tier competition in a high-octane series, the hosts hammered the final nail in the coffin on Day 5 to script their second home series win against Australia since readmission.
What separated Australia and South Africa in the series decider in Cape Town?

The Toss Gamble
The drama in the 3rd Test ensued before the game even started, when Pat Cummins won the toss and opted to bowl first, on a surface that seemed perfectly suited for batting first, with little on offer for the bowlers. South Africa certainly weren’t complaining about being put in to bat first on a flat wicket, and raced away to 140 within the first session alone, on Day 1.
Marques Ackerman and Aiden Markram put on the highest opening stand for South Africa against Australia since 1957, with 158 runs. Ackerman’s intent was impressive. He was careful at first, scoring 17 runs off his first 30 balls, but was ready to play his shots and punish loose deliveries once he was set. His next 40 balls produced 51 runs, and he was strong on the leg side, when Australia faltered in their lines. 52 of the balls he faced were on the stumps or going down leg, off which he scored 70 of his runs.
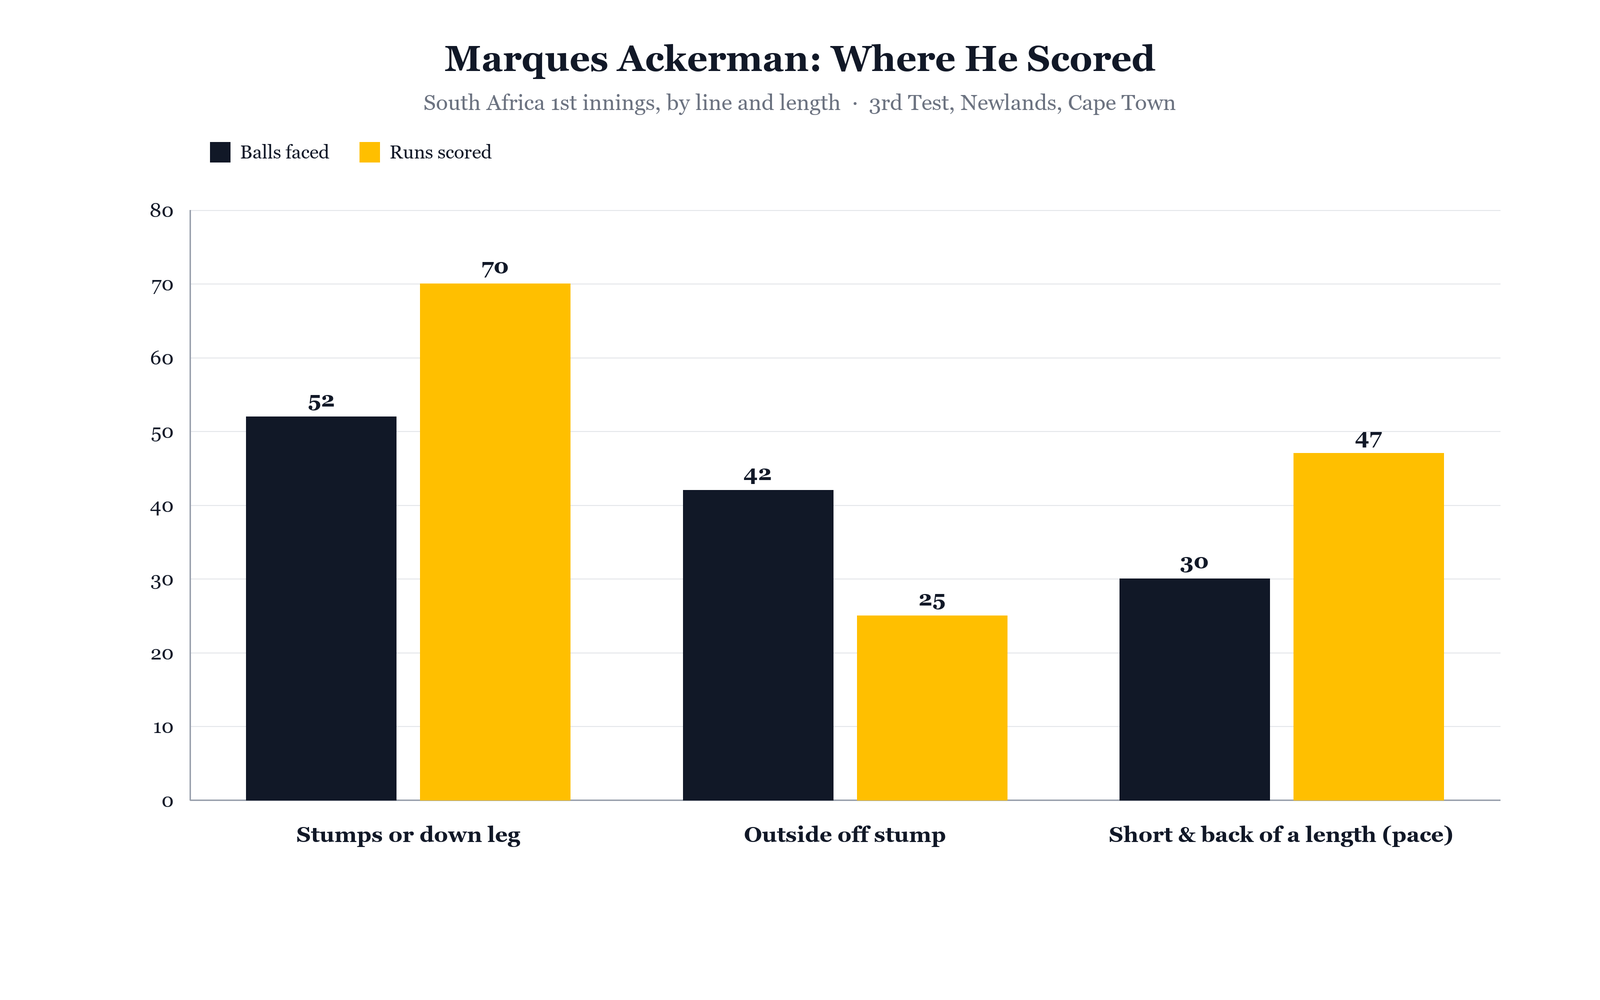
Against short balls, Ackerman took on the opposition and was ready to pull. The bounce off the surface was true and balls rarely took off, so Ackerman made the most of the conditions, scoring 47 off 30 back-of-a-length or short balls. In the 25th over, Ackerman hit 4 consecutive boundaries off Mitchell Starc, 3 of which came off the cut shot.
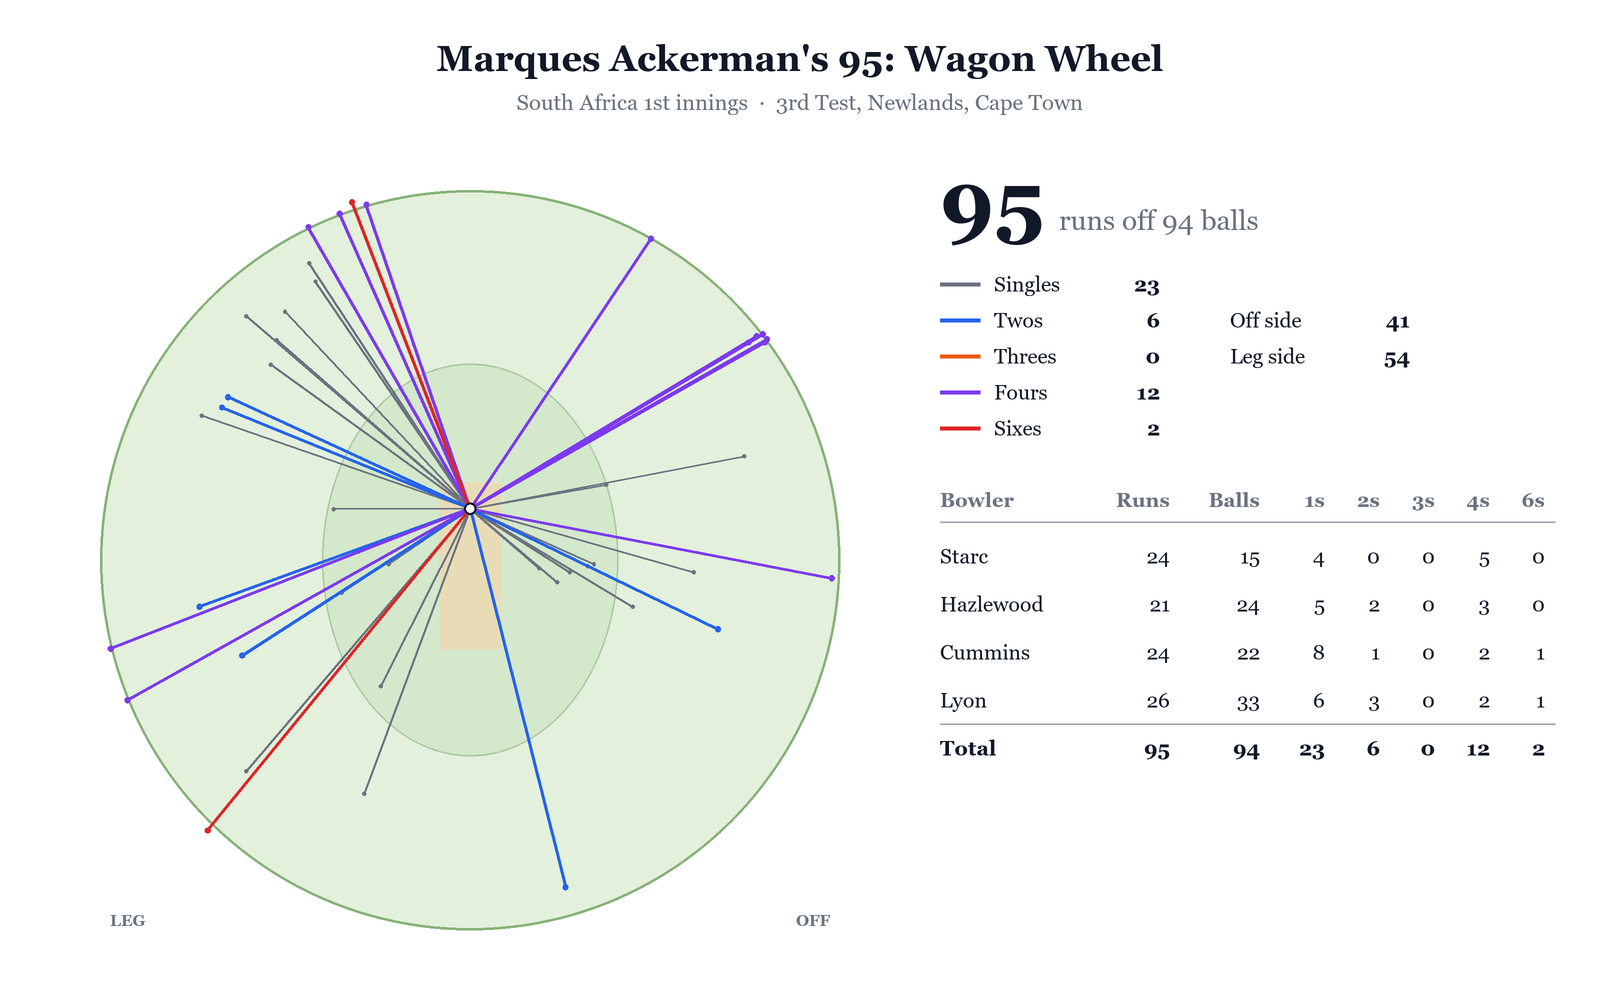
It was his aggression that led to his wicket, as he stepped out on a wider delivery from Lyon, and fell for the stumping, just 5 runs short of a maiden Test hundred.
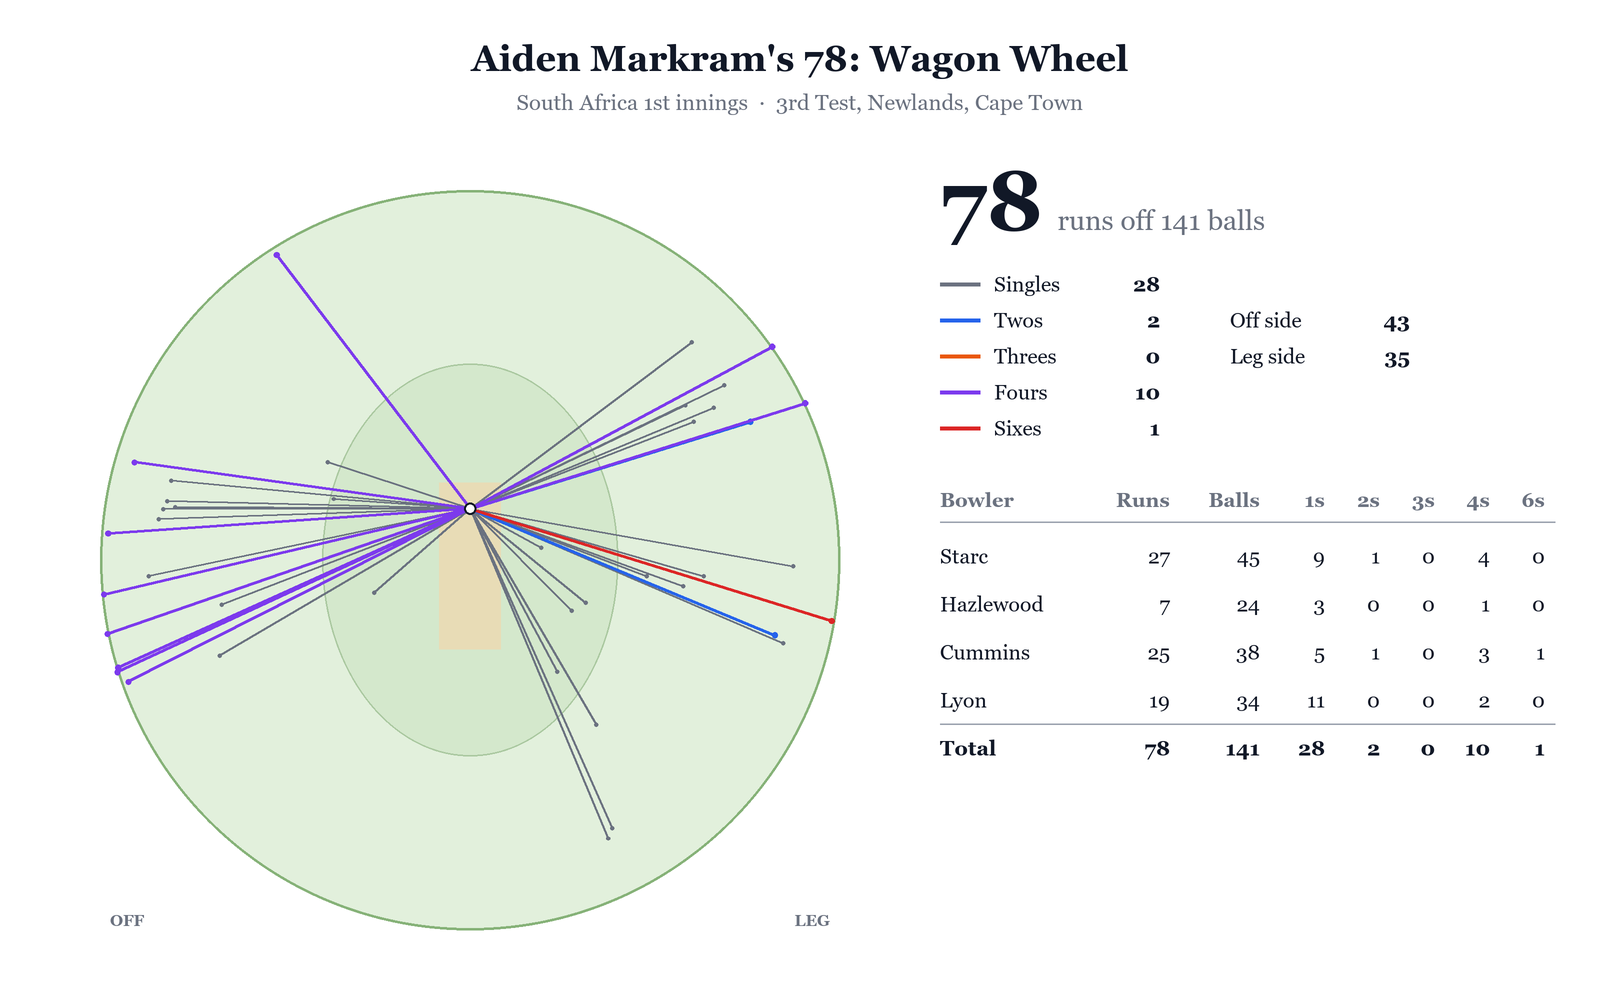
Aiden Markram at the other end soaked up pressure, and was methodical in his run scoring. He flexed his flourishing cover drives and stylish off-side play, scoring 56 of his 78 runs from balls outside off stump. Australia targeted his leg side, bringing in a leg slip and starving him of runs. With the flick shot, Markram had a false-shot percentage of 21%.
Short-Ball Ploy & Starc's Cleanup
Once again in the series, Australia’s cartel relied on the short-ball ploy to get rid of the South African batters. They kept feeding short balls to the batters, with a deep square leg, deep midwicket, and deep fine leg. Both Aiden Markram and David Bedingham, who were well set after notching up half-centuries, sent a pull shot to the deep fine leg region and were caught at the boundary. Mulder, too, nicked a pull shot on just his 2nd delivery. Lyon held up the other end, picking up 2 wickets for 18 runs in his 9-over spell.
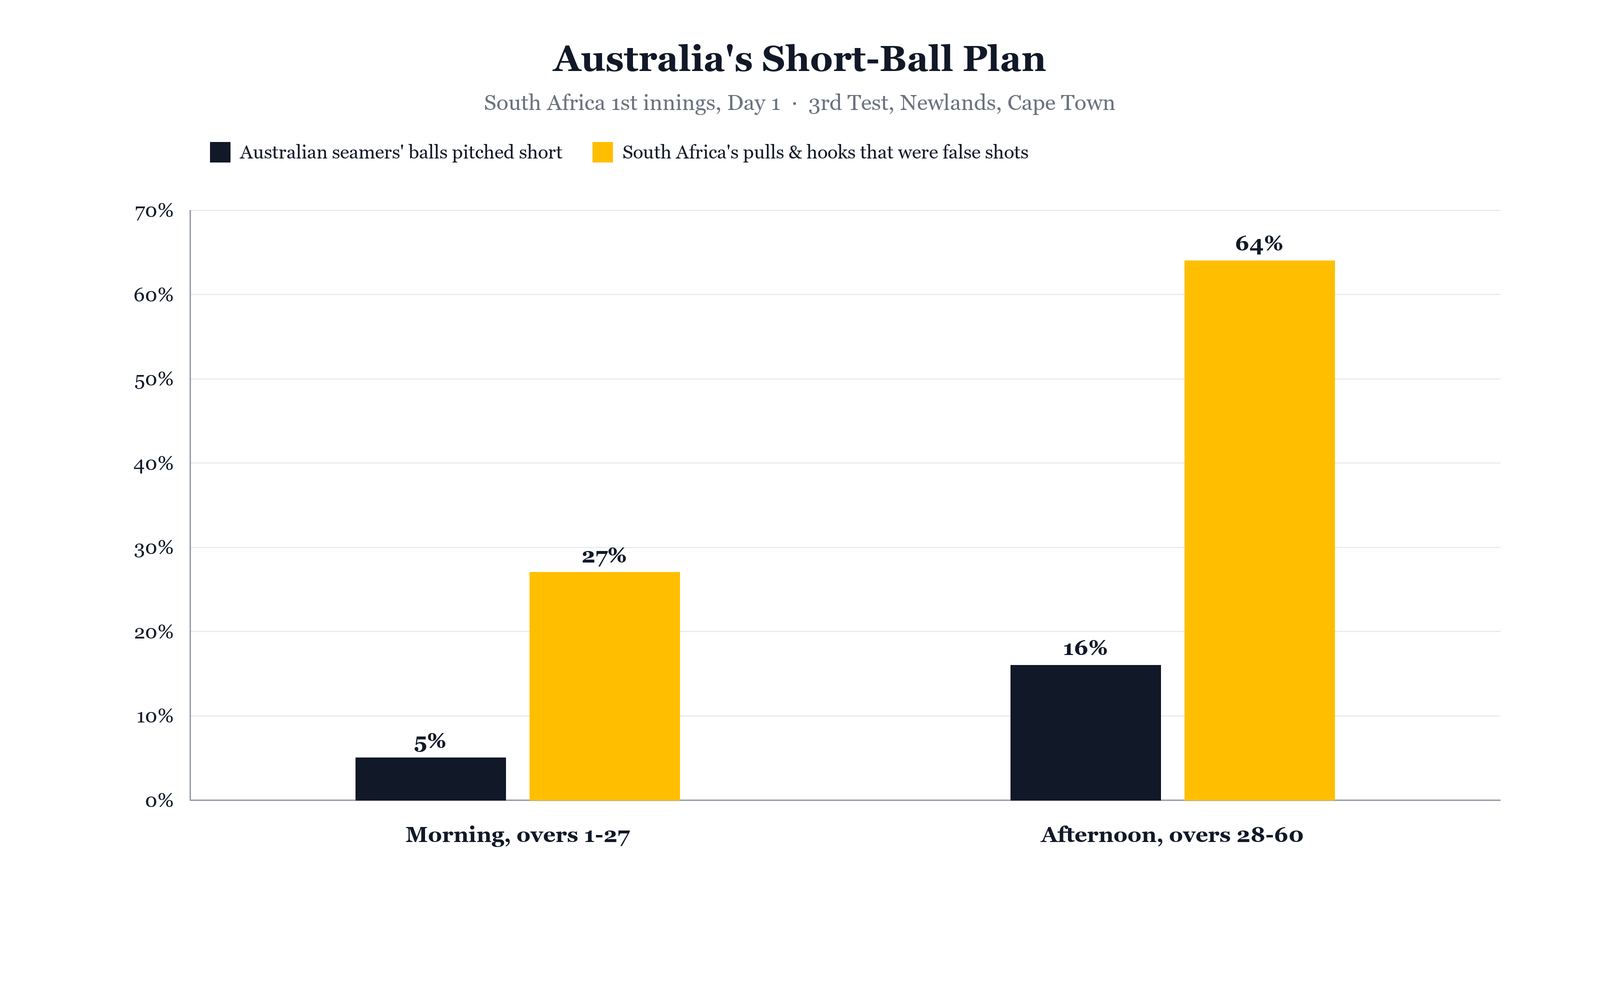
South Africa’s innings quickly crumbled from 158/0 to 232/6, and from expecting at least 450 on a good batting surface, they were fighting to cross 300. Rickelton and Jansen put on 92 runs for the 7th wicket, with Jansen scoring another quickfire half-century. Australia looked to get through overs quickly for the second new ball, and rotated through the spinners; the batters capitalized, upping their scoring rate.
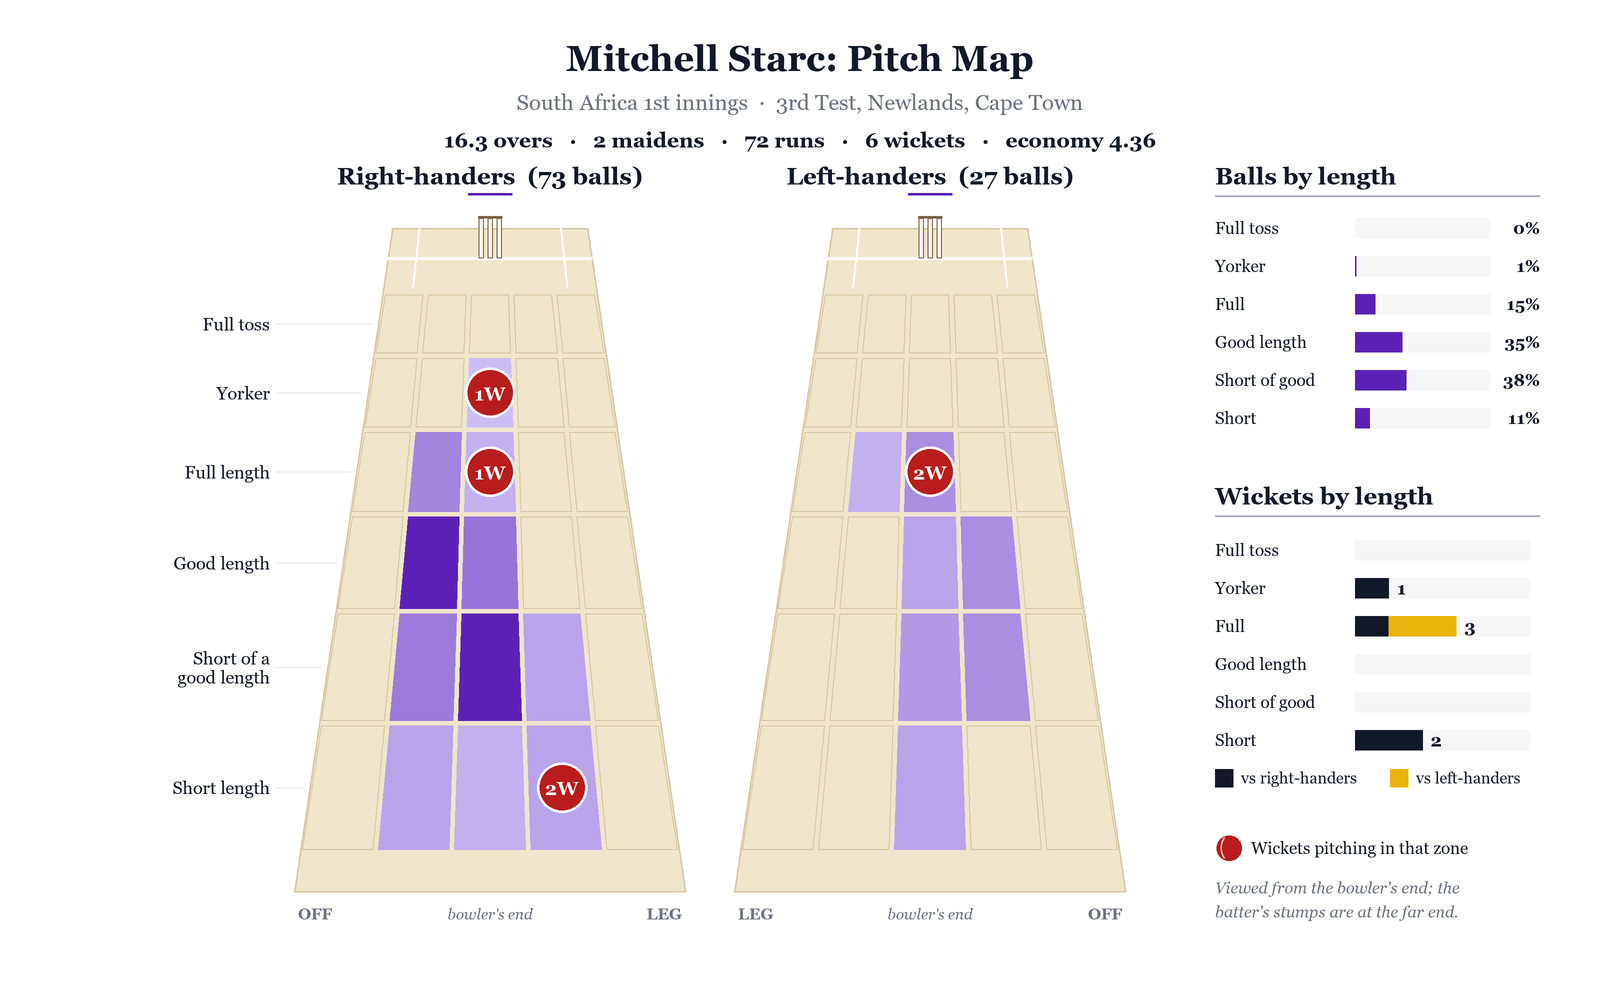
It was all over when Mitchell Starc got his hands on the second new ball, though. Clouds began to assemble overhead, the light started to fade, and the red ball looked shinier than ever. Starc had come into this game lacking a bit of rhythm in the first 2 Tests, and in the first session, he gave away 62 runs in his 12 overs. In the 81st over alone, he trapped Ryan Rickelton lbw with a full outswinger, and bowled Marco Jansen with one that swung back in late and ripped out the off stump.
In his very next over, Starc got rid of Coetzee and Rabada with 2 more full deliveries, and the innings was wrapped up then and there; 4 wickets in just 6 deliveries for Starc. There was an air of inevitability around this, and it almost seemed like South Africa themselves knew the innings would be over once Starc broke the Rickelton–Jansen partnership. The remaining wickets fell like a deck of cards, and Day 1 concluded with Australia slightly ahead, trailing by 329.
Australia's Batting Future
There was much speculation over how Australia’s batting lineup would fare without Steve Smith, in a high-pressure game. Cummins’ left-field decision to bowl first didn’t help, adding to the scrutiny that there was a lack of confidence in the batters. However, they can draw a lot of confidence from a solid display of partnership batting and cashing in on a good surface. Travis Head got off to a flyer, scoring 41 off 49 balls, attacking anything short that came his way.
Australia started well, and it took a brilliant over from Simon Harmer to break their momentum, as he dismissed Head and Labuschagne in the same over.
Renshaw played the patience game once again, leaving anything back-of-a-length outside off. Against Harmer, Renshaw’s game was tested, as he played 17% false shots against the spinner.
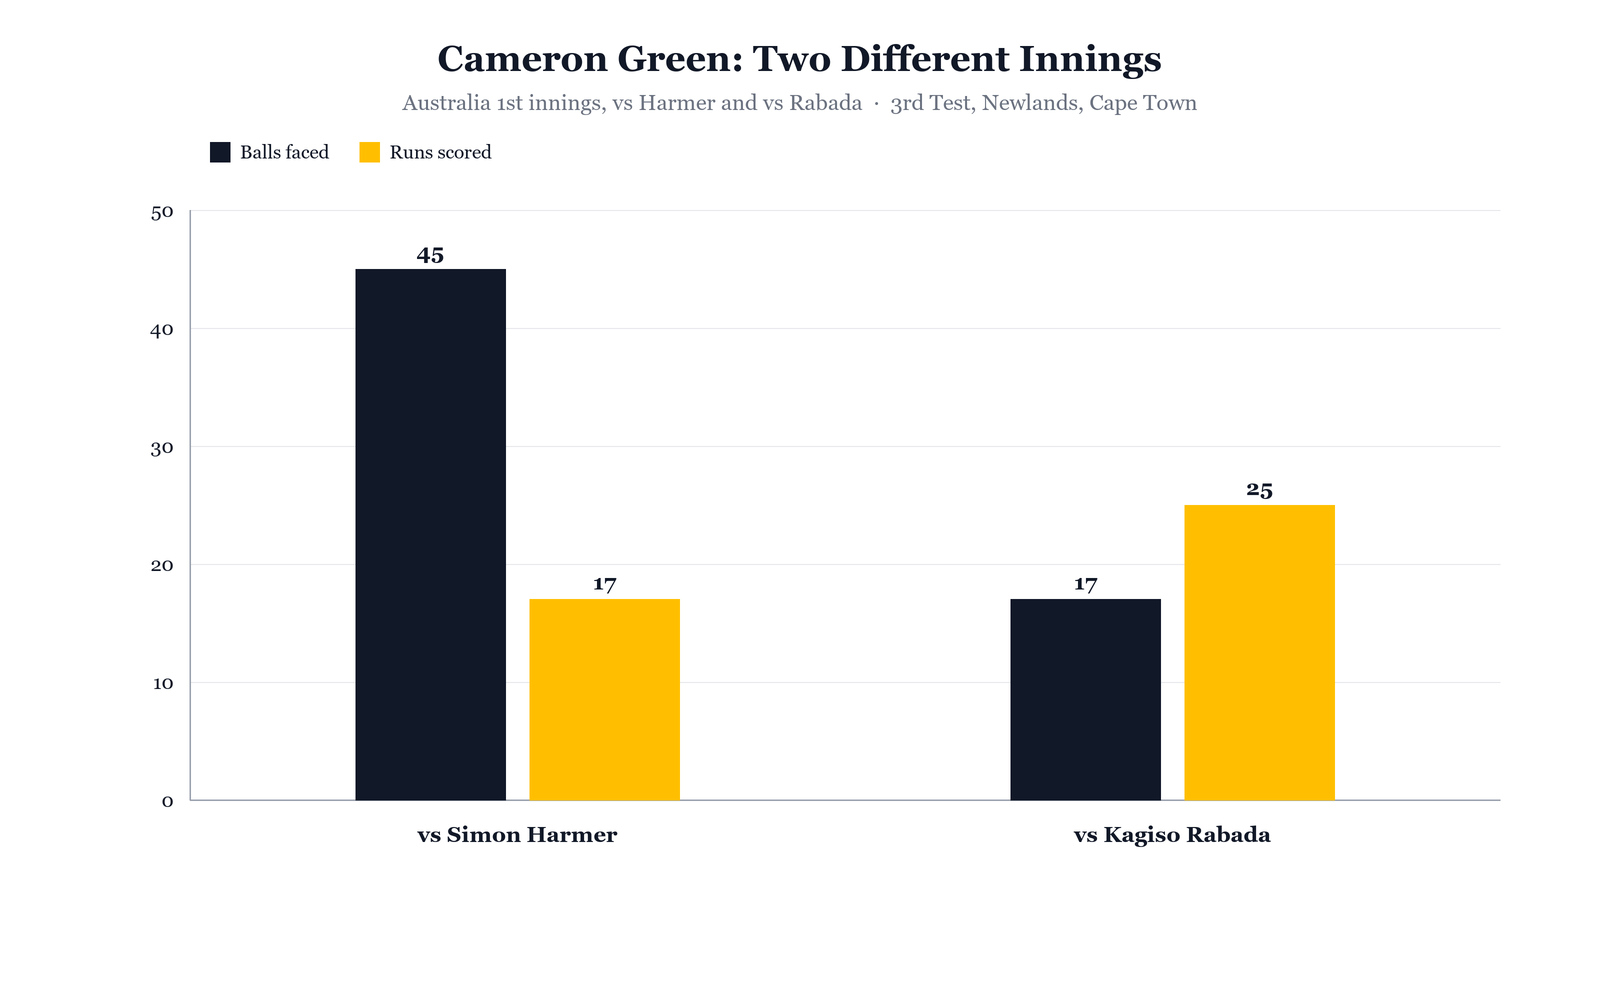
Green on the other hand looked very solid against Harmer, buckling down to score 17 off 45 balls with only 2% false shots against the spinner. He played his shots against Rabada, scoring 25 off 17, including 2 sixes and a four from 3 consecutive balls. The pair put on 126 runs for Australia.
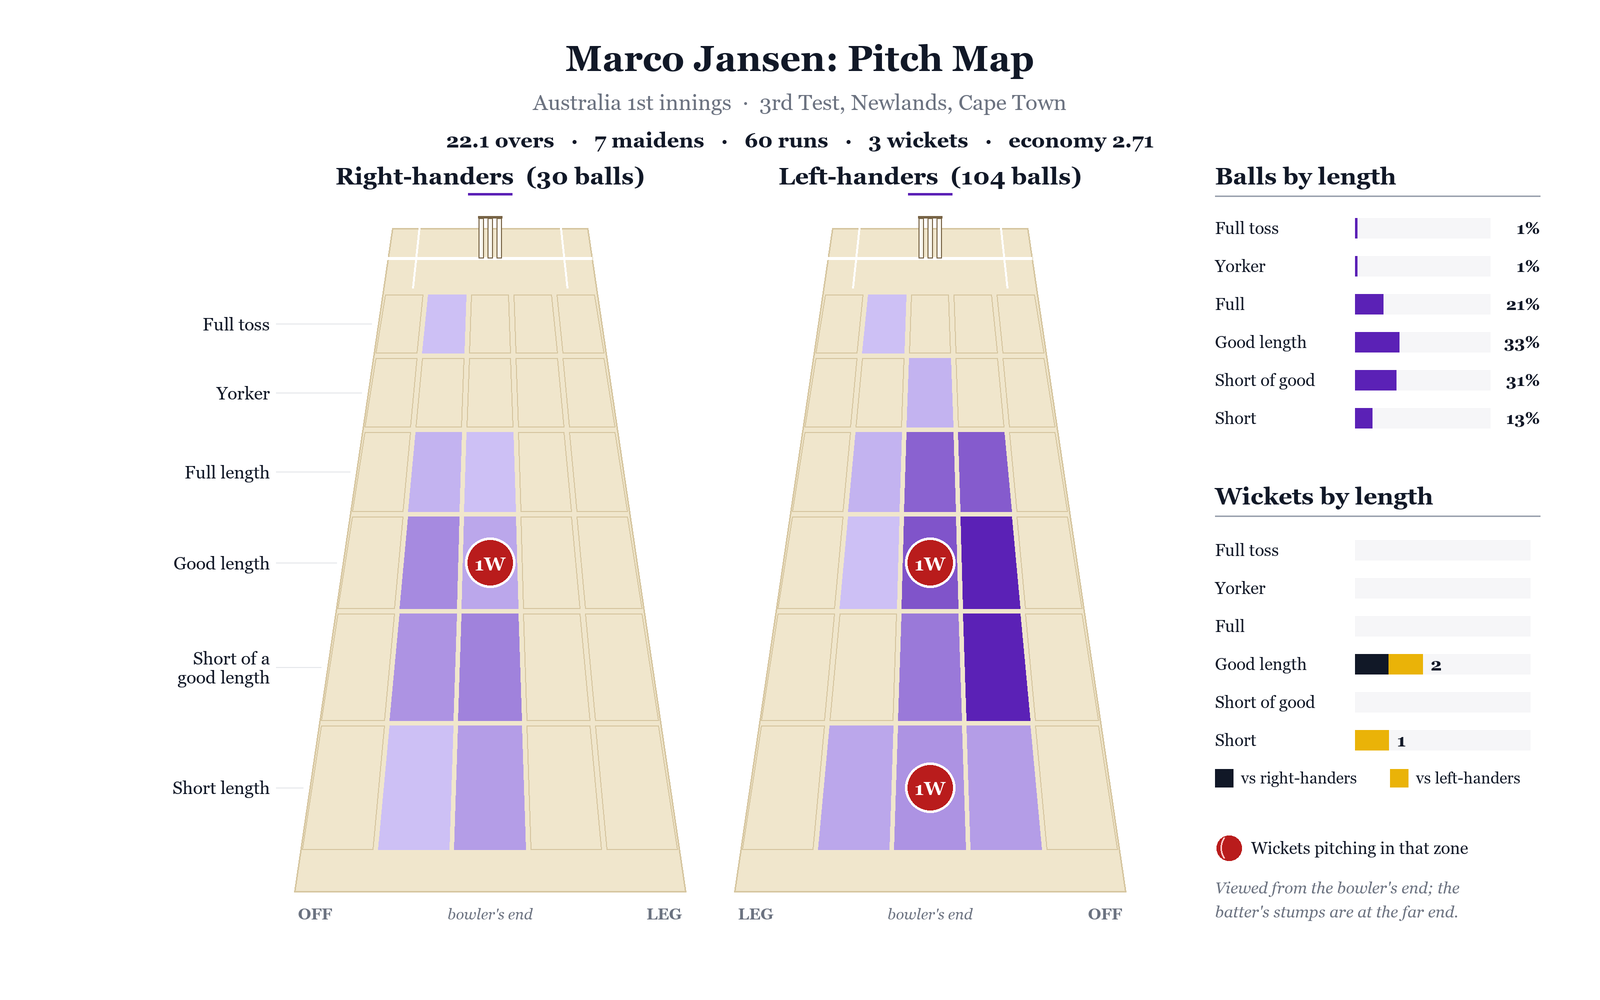
Jansen returned for a spell, after being used sparingly throughout the day, and cleaned up the pair, picking up his 100th Test wicket. He finished the innings with 3 wickets from 22.1 overs, and was South Africa’s most economical bowler, with 76% dot balls and 20% false shots.
Inglis and Carey then put on another massive partnership, closing out Day 2 and batting into Day 3. Carey anchored the partnership, looking solid against spin with only a 6% false-shot rate, compared to 16% against the pacers. Inglis, on the other hand, played positively throughout the innings, taking on Simon Harmer. His leg-side play was strong and he regularly rotated the strike with the flick, and could rely on his cut shots to produce boundaries and release pressure.
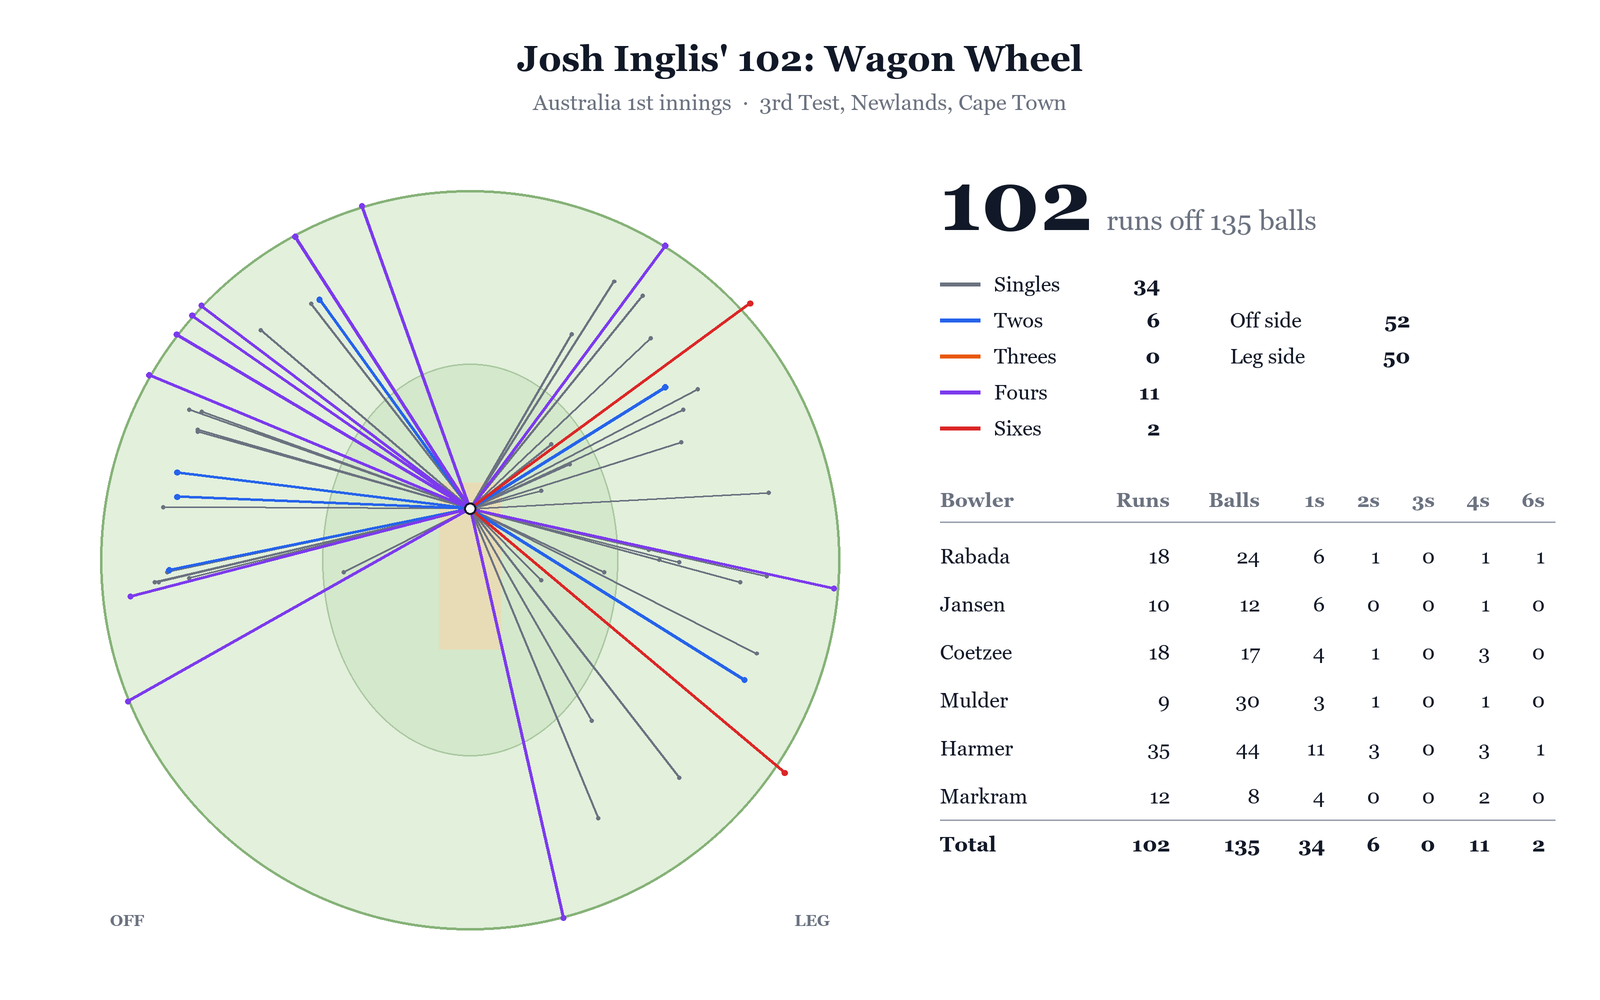
Inglis and Carey added 185 runs together, and after some resistance from the tail who put on 49, Australia finished with a lead of 100, now firmly ahead in the game.
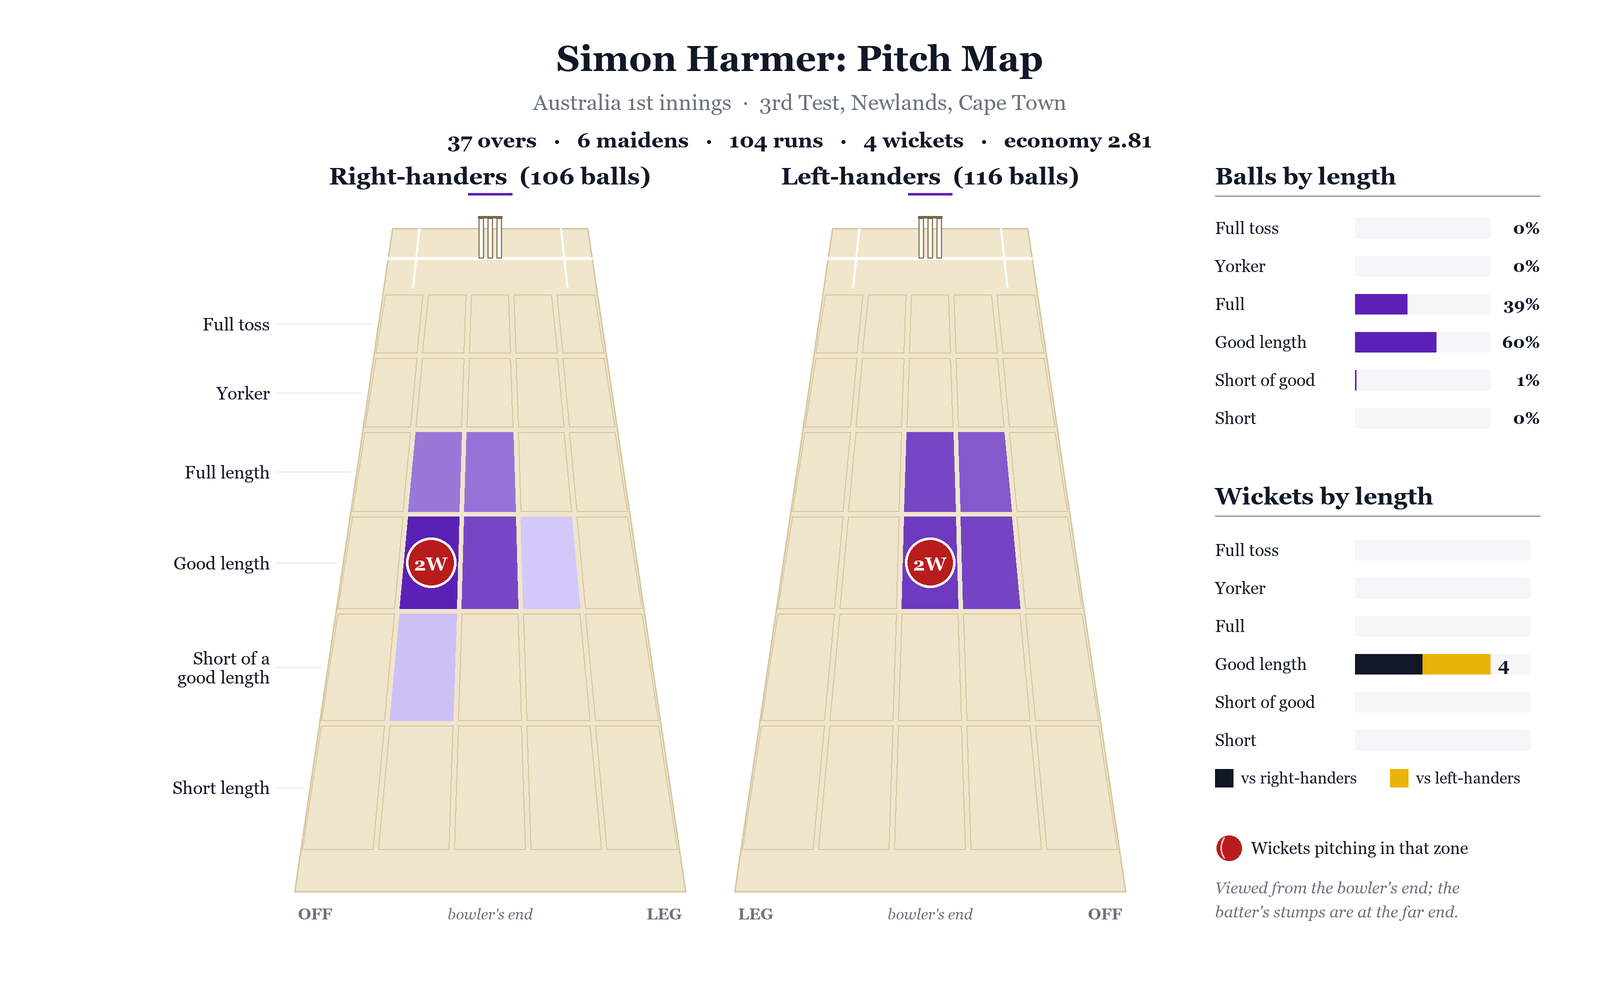
Harmer controlled the first innings, picking up 4 wickets in his 37 overs, with 71% dot balls. Only 1% of his balls were short, and his control over line and length was masterful. He kept asking questions and beat both sides of the bat, looking threatening with the turn the surface began to offer.
Proteas' Resilience
South Africa’s 2nd innings started very differently from their 1st. Within 8 overs, they were 31/2, with Markram holing out at mid-off, and David Bedingham succumbing to yet another pull shot.
Ackerman looked fluent once again, for a well-paced 62. He was more careful against the short ball, but remained positive and kept the scoreboard ticking even as wickets fell at the other end. Starc bowled a brilliant surprise bouncer that got Ackerman on the grill, to dismiss the left-hander.
The tempo of the game completely flipped after his wicket, as Bavuma and Breetzke looked to grind out the last session and take South Africa to Day 4 without more damage. Cummins made 12 bowling changes in 34 overs, desperate for another wicket before the end of the day’s play, and even burned through 2 reviews in this time. The captain himself struggled for wickets, despite hitting the right areas with the ball.
Right at the end of the day’s play, Nathan Lyon was able to build up pressure to sneak a wicket. Lyon produced 21% false shots and 73% dot balls in his 14 overs on Day 3. He packed the field around the batter, with a gully, slip, short leg, and silly point.
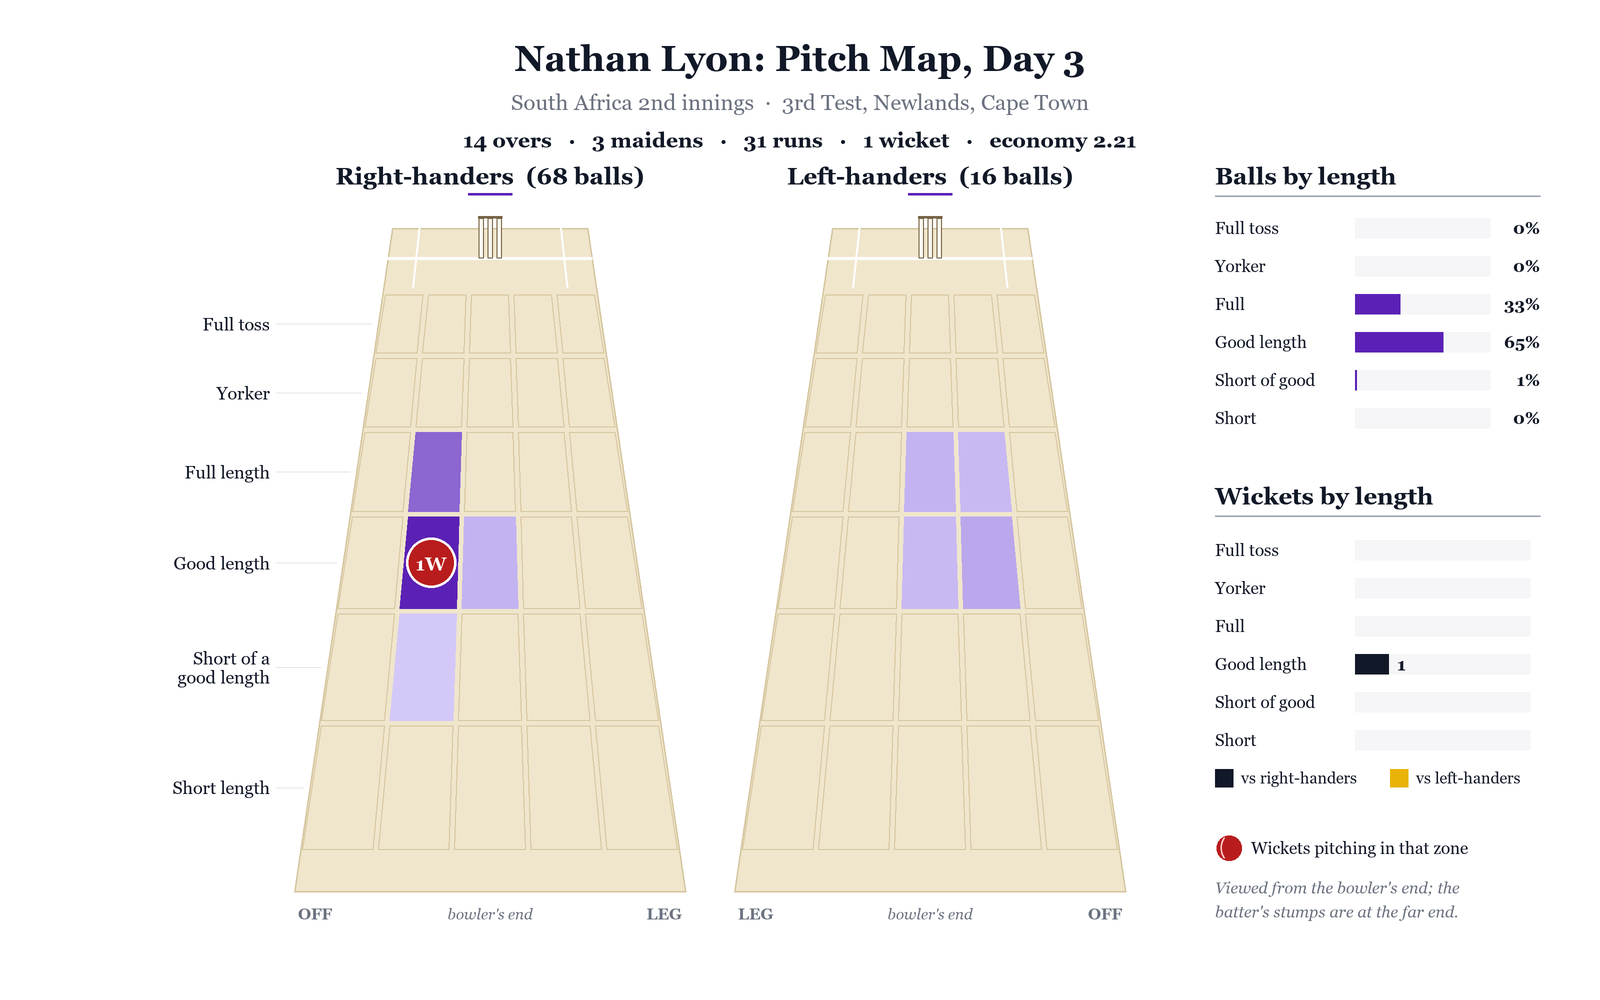
Bavuma scored a solid 35 off 115 balls, soaking up pressure while passing 4,000 Test runs. However, he struggled against Lyon, with 20% false shots. Right before the end of the day’s play, Bavuma tried to whip a ball from outside off stump to the leg side, and closed the face of his bat too early, allowing the ball to grip and turn in, crashing into the off stump. The doors opened for Australia once again, and South Africa finished the day 4 down with a lead of 40.
The Proteas had their work cut out for them, and needed a few more partnerships to post a par score. Australia’s pacers attacked the pair with short balls: 88% of Starc’s balls on Day 4 were either back-of-a-length or short. Cummins picked up the wicket of Breetzke off a short ball – his first wicket in 374 balls. Rickelton and Mulder then settled down and put away all low-percentage shots, slowing the game down and ensuring South Africa worked towards a competitive total.
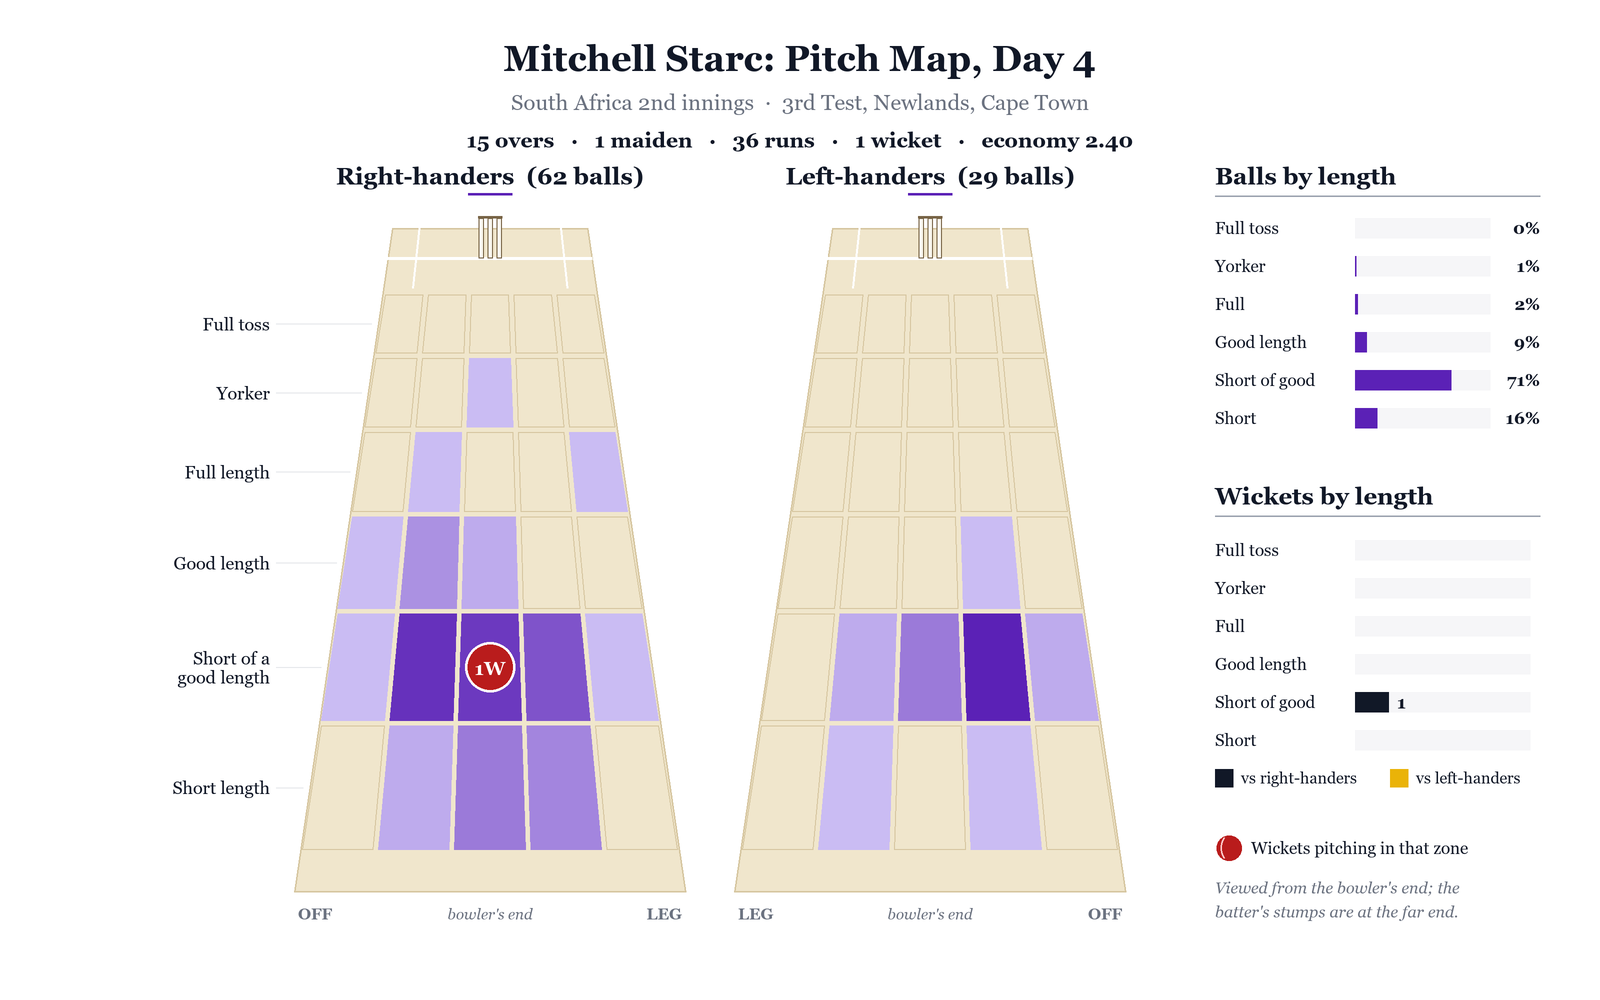
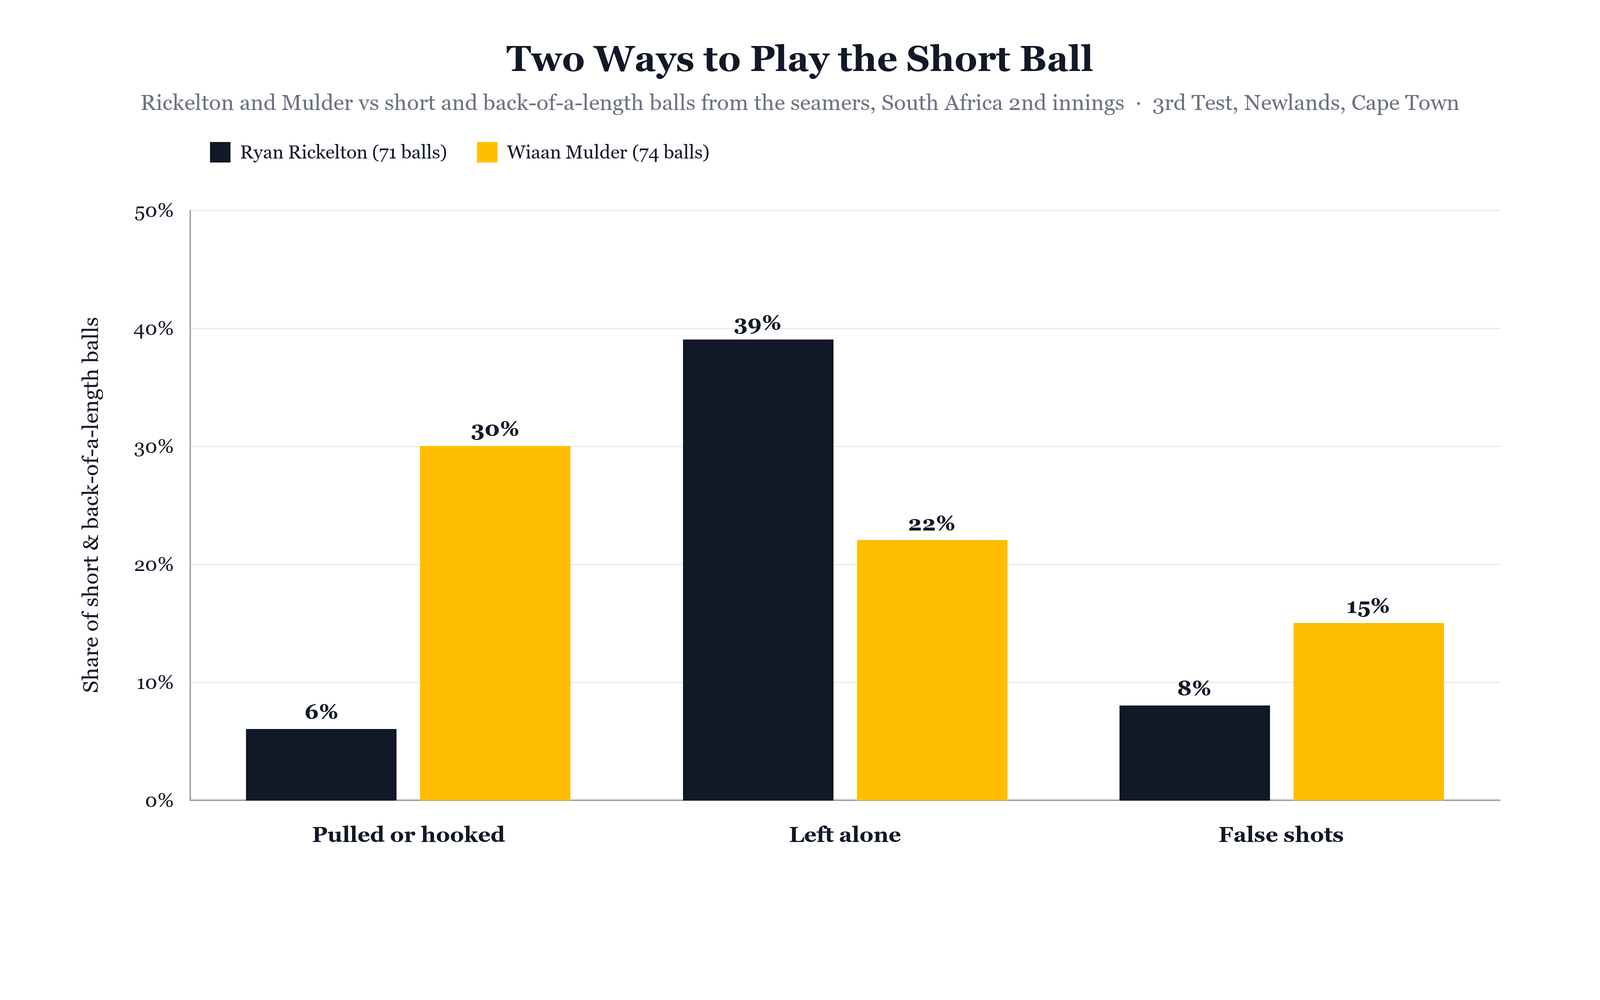
Of the 71 short balls Rickelton faced on Day 4, he only played 4 pulls or hooks. Against Nathan Lyon, too, Rickelton was conservative, scoring 28 off 75 balls. He took blows to the body, and survived a few chances, but ensured he was out in the middle to register his 3rd Test century, a game-changing innings for South Africa.
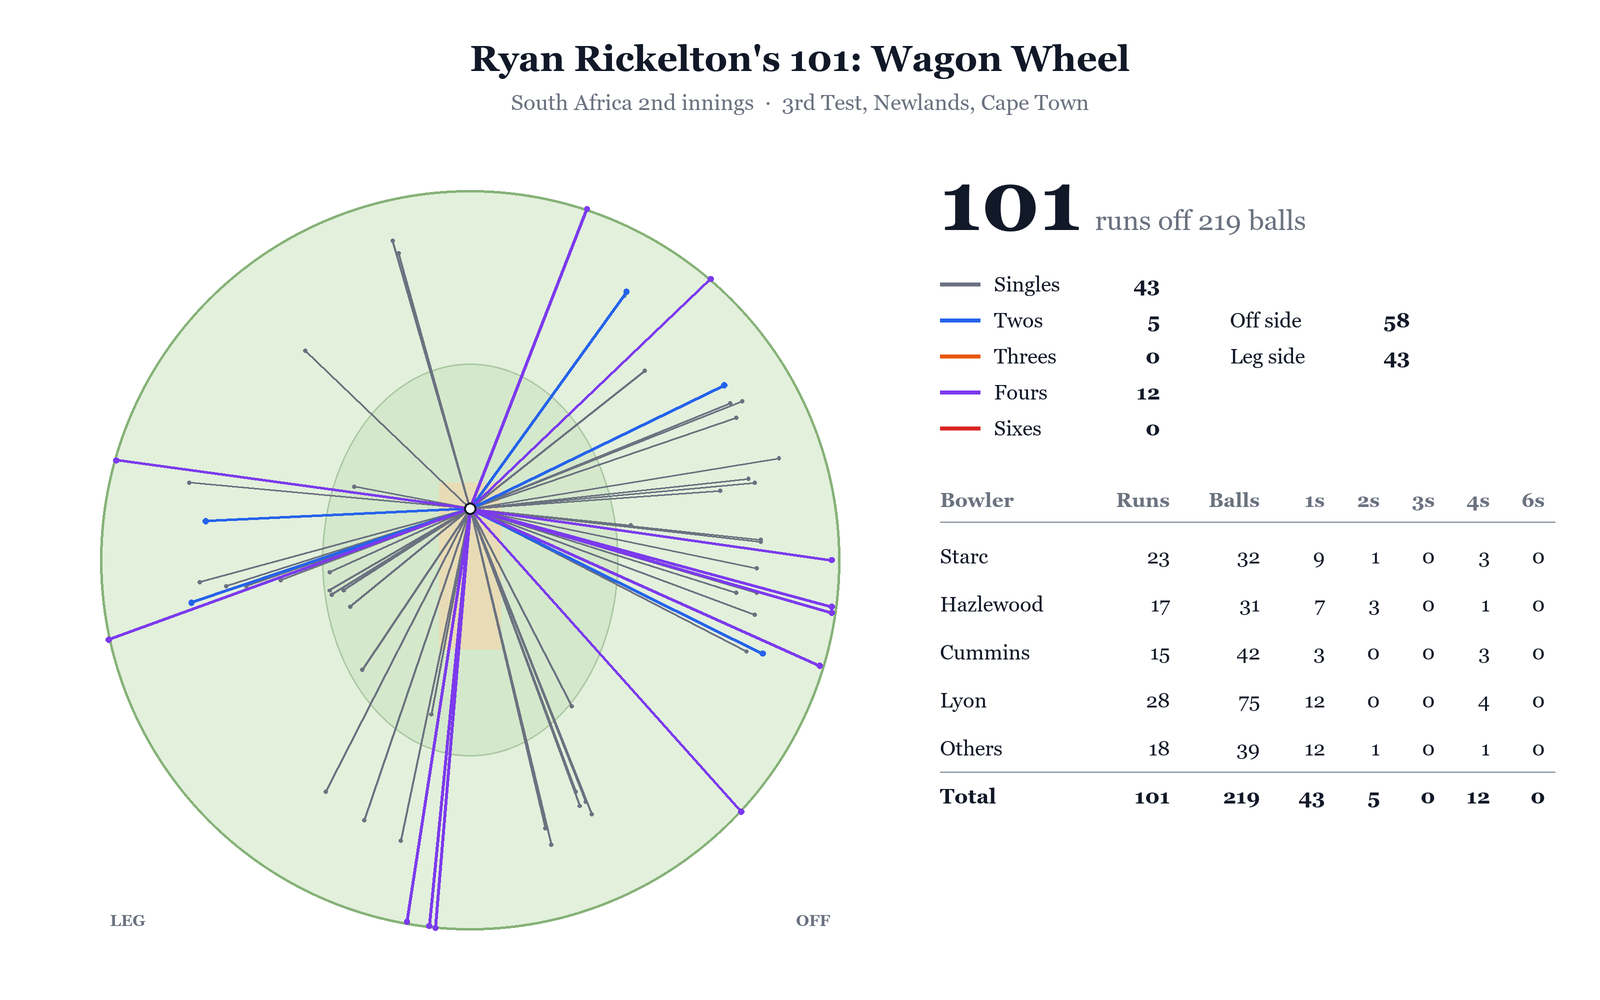
Mulder, on the other hand, took the short ball on. He played 24 pulls and hooks over his innings, producing 28 runs. The pair, who have played together ever since school cricket, gelled incredibly well at the crease, complementing each other’s games. Rickelton wore the bowlers down, and Mulder quickly pressed the advantage.
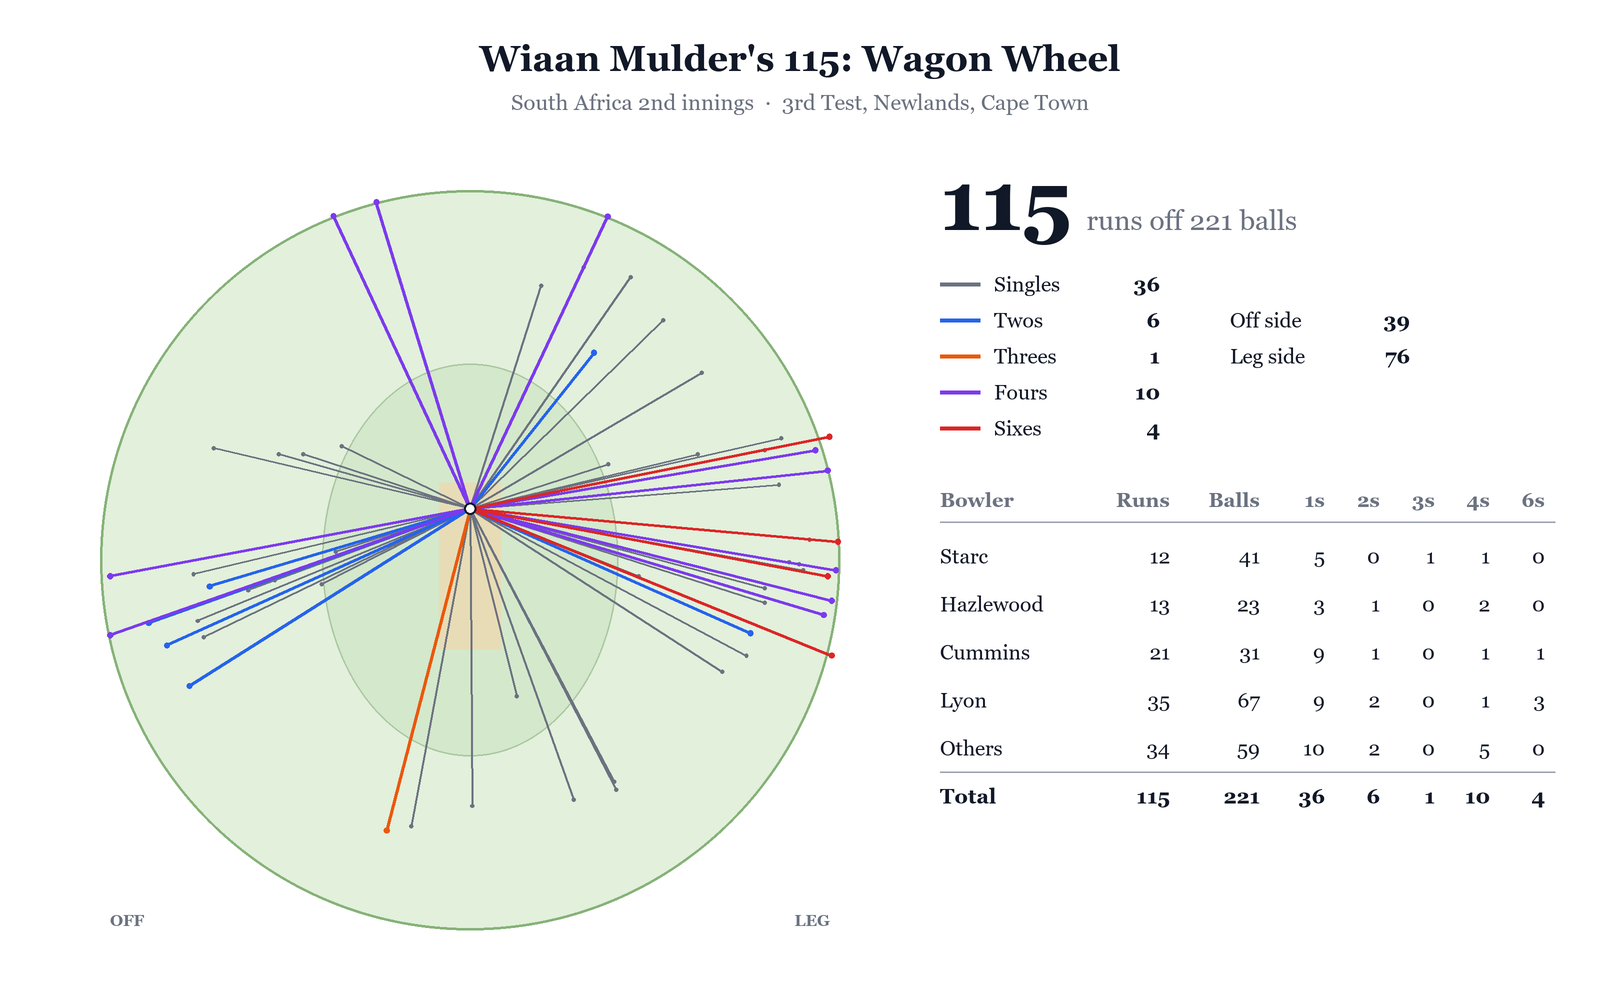
Rickelton was run out, and South Africa lost a quick 4 wickets for just 16 runs. However, Mulder stepped up, farming the strike with Rabada to put on 36 for the last wicket. He played some expansive shots but ultimately holed out to Starc, finishing on 115 right at the end of Day 4.
Day 5
Day 5 was set up to be one of the most cinematic finishes to a Test match this decade. With 288 to chase and a forecast of a full 90 overs’ worth of play, both teams had a great chance of winning the game and series, scripting history for their countries.
Within the first over, though, the game seemed wrapped up. A fiery Kagiso Rabada stormed in and got rid of Renshaw on just the 3rd ball of the innings, down the leg side. Just 3 balls later, a tentative Marnus Labuschagne shoulder-armed one that jagged back in, and lost his wicket. Rabada picked up 2 crucial wickets within the first over, and the crowd was roaring.
It was a downhill battle from there, especially once Travis Head nicked off to Rabada on just 14 runs. Australia’s lineup collapsed quickly, and the batters looked helpless.
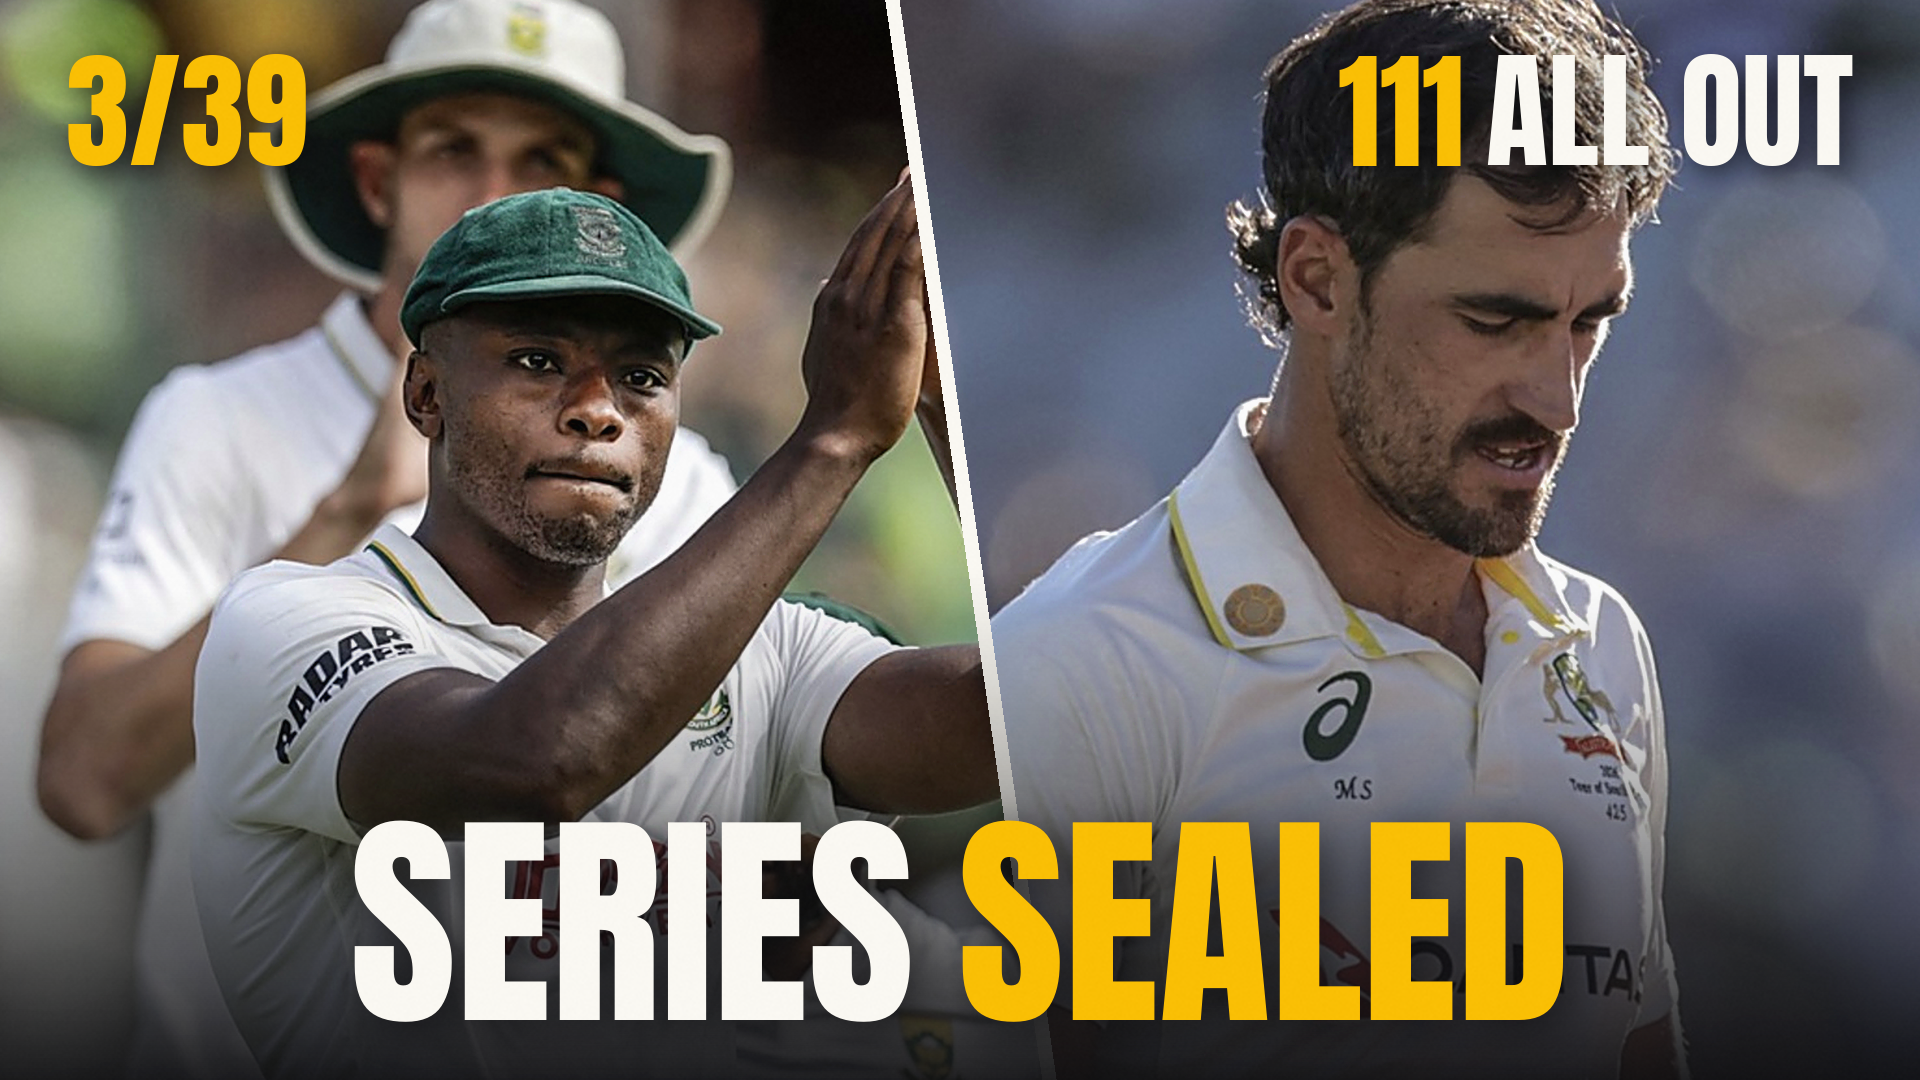
Simon Harmer, in an interview, claimed that South Africa would be able to bundle out Australia for as low as 120. They did exactly that, getting Australia all out for 111. Harmer picked up 6 wickets for just 16 runs in his 21.1 overs, his career-best figures, and his first 10-fer in Test cricket.
Harmer targeted the rough and looked as threatening as ever on this Day 5 pitch.
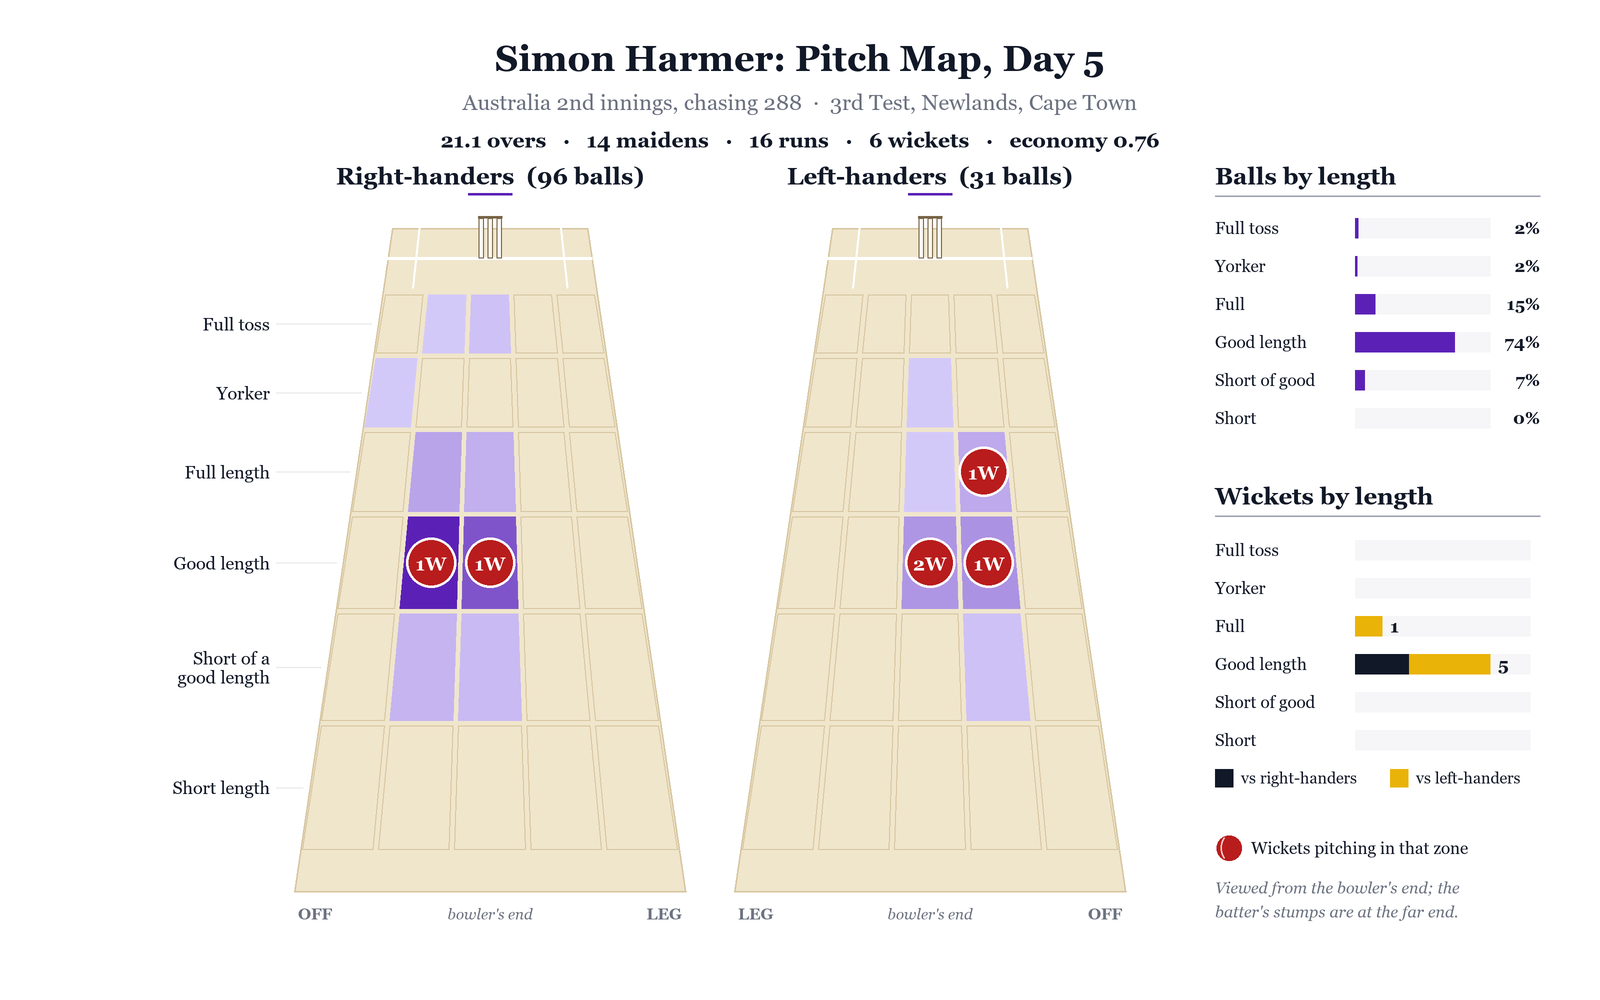
Some poor shot selection from Australia didn’t help their cause either. Alex Carey played a reverse sweep off Harmer that went straight to Jansen at point, and Cooper Connolly was tempted into a cover drive that he nicked, on just his 2nd delivery.
Harmer packed the field around the stumps, having as many as 6 fielders around the bat at one point. His battle against Green was most interesting. Starc was sent in ahead of Cummins, and he ended up taking most of the strike against Harmer, South Africa’s most potent bowler. Eventually, Harmer changed ends and got a go at Green, and on the very first ball, the batter charged down the pitch and missed the ball, which drifted away but turned in viciously to hit the top of off.
South Africa dominated Day 5, and claimed a resounding victory after a closely contested 3 weeks of Test cricket.
What's Next?
South Africa will feel on top of the world, with the character and grit they have shown in the second half of this series to make a comeback. They have an incredible summer of Test cricket awaiting: 2 Tests against Bangladesh followed by 3 Tests against England at home, before a 2-Test tour of Sri Lanka in 2027. This series win moves South Africa to 2nd on the World Test Championship standings, behind New Zealand, and their chances of securing a spot in the final look a lot stronger.
There may still be a few questions over the batting lineup, though. Marques Ackerman looked confident despite not being an opener in first-class cricket, and he deserves an extended run at the top of the order. David Bedingham, too, got off to good starts at Number 3 throughout the series, and he will look to convert that to bigger scores as he finds his new home in the lineup.
Matthew Breetzke at Number 5 is interesting, as there are quite a few batters vying to break into this lineup, and his position is far from solidified at the moment. We may see the return of Tristan Stubbs, or a call-up for Dewald Brevis, heading into the Bangladesh series.
Meanwhile, Australia have started their 12-month Test odyssey on the wrong note, now having 4 Test losses in their last 7 games. These losses include 2 collapses where the Aussies were rolled for 99 and 111.
It certainly seems like the end of the road for Marnus Labuschagne now, after another middling series with a few failed starts and more low scores. Josh Inglis looked a lot more comfortable at the crease, in the only Test he played, and could be an alternative at Number 3 while he is still in form.
Australia host New Zealand for 4 Tests next month, and we may see a significant reshuffling of the side, to cash in and gain experience on home turf, before a blockbuster Border-Gavaskar Trophy in India. Australia drop to 3rd in the World Test Championship standings, and have the highest order of challenges ahead of them, if they wish to make the WTC final.
The season of Test cricket is only just heating up, and we are in for plenty more drama, heroism, and glory.